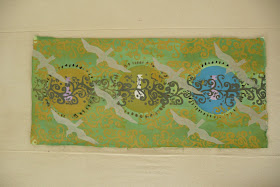
Repeating Pattern – Screen and Screen Again
Recently I’ve been designing patterns to use as repeats. This entry follows the creation and execution of one freehand design that can be used as a repeat.
Step 1: Fold a piece of paper in half to establish a mid line. Draw a free form design. This initial drawing was done with graphite pencil so that adjustments could be made.
Step 2: Make marks at the top of the pattern to delineate where the pattern ends and where the repeat begins.
Step 3: Repeat Step 2 at the bottom of the pattern.
Step 4: Tape the pattern to the back of a silk screen with the pattern facing the front of the screen.
Step 5: Tape all four sides of the pattern to the silk screen frame on the reverse side.
Step 6: Turn the silk screen over and place it on a light box so that the pencil drawn pattern is clearly visible. Start tracing the pattern onto the silk screen.
Close-up
Step 7: Use Speedball Screen Drawing Fluid to block in the pattern shapes.
Step 8: Put some of the Speedball Screen Drawing fluid into a small dispenser bottle with a small metal applicator tip.
Step 9: Turn the silk screen over and start filling in the shapes with the Speedball Screen Drawing Fluid from the back side. Place the screen over a piece of paper to catch any fluid that may drip through the screen.
Close-up: Application of screen drawing fluid.
Completed fill of the design with drawing fluid.
Step 10: Let the drawing fluid dry completely. Drying time will depend upon ambient temperature and humidity, but the fluid is usually dry within 2 to 3 hours. On warm and dry days, drying time is significantly reduced.
Step 11: Apply Speedball Screen Filler with a paint brush over the entire screen and covering the dry drawing fluid.
Screen covered with Speedball Screen Filler.
Step 12: After the screen filler is completely dry, rinse off the underlying screen drawing fluid. The drawing fluid dissolves quickly while the screen filler remains embedded onto the screen. (Note: When there is a need to change the image, the screen filler can be removed from the screen with soap and water. I prefer to use Krud Kutter because it removes the screen filler rapidly and can also be used for myriad cleaning jobs around the home and studio.)
Here is what the screen looked like after screening with gold screen printing ink. The gold only adhered to the screen filler, not to the pattern (even though it looks as if the pattern is obscured in this picture.)
In the present example I used a swath of fabic onto which I had previously screened a series of three circular lock with keyhole designs onto white fabric. The freeform repeating pattern was initially screened in black over the keyhole design.
To further embellish the fabric two of the keyholes were pained on the reverse with lavender fabric dyes. They were painted from the reverse so that the freeform black design would not be obscured but the thinned dye would come through to the front. The design was further deepened by applying thinned down green Grumbacher fabric dye around the lock/keyhole designs with a sponge brush. After the green background was dry, the freeform screen was used again. Onto the green layer, gold Speedball fabric printing ink was used with the freeform screen. To further enhance the visual impact birds were screened onto the background and overpapped the kehole and freeform designs. The lock/keyhole and bird screens follow this picture. Close-up of one part of the printed fabric.
Another printed section of the fabric.
Pictures of the two additional screens used
Lock and keyhole screen in which an embroidery hoop was used for the screen frame.
Bird screen: The bird form was cut from a sheet of overlapping masking tape strips and adhered to the screen in an embroidery hoop frame.
Now I am playing with the idea of cutting a stencil or printing on Bubble Jet Set prepared fabric or finding a Thermofax service so...
Here is another rendition of the repeating pattern.


