Recently I was interviewed by Deborah Stanley, a superbly talented fiber and quilt artist, for a Featured Artist's Interview that has just been published in the Fountain Valley Patch On-Line News. I am supremely honored to participated in this series of interviews and offer great thanks to Deborah for the time she devoted to making this interview a success.
A site dedicated to fiber arts, art quilts, soft sculpture, surface design, and optimizing techniques in other artistic media.
Tuesday, October 16, 2012
Artist Interview Series on the Fountain Valley Patch
Recently I was interviewed by Deborah Stanley, a superbly talented fiber and quilt artist, for a Featured Artist's Interview that has just been published in the Fountain Valley Patch On-Line News. I am supremely honored to participated in this series of interviews and offer great thanks to Deborah for the time she devoted to making this interview a success.
Friday, October 12, 2012
Melanie Testa's Breast Pocket Project
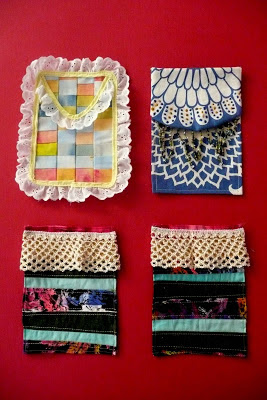
Melanie Testa's Breast Pocket Project to honor and recognize all the brave women who have chosen not to have reconstructive surgery after mastectomy has moved me to create 4 pockets for her project. For many years I worked in a university based breast surgery program and came to know personally the significant choices that a women has when faced with body altering surgery and the impact that these choices have upon their lives. I was also deeply moved by Mia Bloom's pockets that she made to honor her mother and her mother's friend. Here are the four pockets that I have created to pay homage to the bravery and commitment to life for all the "flatties", as Melanie lovingly refers to each who has made this choice.
 |
| All Four Breast Pockets |
 |
| Close-up of Breast Pocket with Ruffle |
 |
| Close-up of Two Breast Pockets with Strips |
 |
| Close-up of Breast Pocket with Beads |
Thursday, October 11, 2012
Fantastic Vintage Beading
Years ago I met Doug and Barb Keeling as vendors of Keelings Krafts at various quilt show venues throughout Southern California. As lady luck would have it, the Keelings were almost neighbors and a beautiful friendship has developed over the years. Barb has a gazillion beautiful things in her private collection and today she decided to open an Etsy shop called KeelingsKraftsDolls and share a few things with the wide, wide world. All you aficionados of vintage beading will enjoy visiting her shop to see a few of her vintage, heavily beaded purses. The big bonus is that Barb's prices are super reasonable. Here are just a few of the beautiful, beaded purses:
Wednesday, October 3, 2012
Prayer Flags at the Oceanside Museum of Art
The Oceanside Museum of Art is hanging hundreds of Prayer Flags from across the world in concurrence with the Quilt National event. Since I just discovered that the museum is still accepting submissions, and since the museum is a stone's throw away from my home, I am going to deliver the flags that appear in this posting. If they require only one, I hope that the museum will make that choice for me.
Balance
I pray for balance, for a life
in balance is a life at peace.
Honor the Day
I pray for each day to be
honored, for it cannot be lived
over again.
Hope
I pray for hope because hope
makes all things possible.
Growth
I pray for growth, for where
there is growth there is life.
Peace
I pray for peace that will build
a safe planet for those who
come after us.
Commitment:
Taking the First Step
I pray for commitment to take
the first step toward any
goal. The rest of the journey
will fall into place.
Joy
I pray for joy in the world, for
where there is joy there is no
place for discord.
Now, it's back to working on "Out of the Ashes--Beyond Boro".
Tuesday, October 2, 2012
Out of the Ashes - Beyond Boro (Part 2)
In order to stabilize the compromised
fabric while also keeping it supple, I chose to make a batted backing unit to
top stitch onto the back of the scroll.
Here are the steps that this process required.
Scroll
Laid atop Batting
Cutouts
and Orientation Marked on Batting
Cut
Out Circular Areas
Place
Batting onto Backing
Cut
the Backing to Match the Batting
Backing
Fully Cut to Match Batting
Stitch
around the Backing and Batting Unit.
Leave Opening to Turn Fabric Right Side Out
Clip
Curves
. Turn under Area Left Open for Turning. Pin
Backing/Batting Unit to Back of Scroll
Stitch
Very Close to the Edge of the Batting/Backing Unit
Free Motion Quilting Partially Completed.
To be continued...
Monday, October 1, 2012
Out of the Ashes - Beyond Boro
Recently a friend conjectured that I might be able to use the two
wooden rods on a tattered fabric scroll and and she gave the entire scroll to me. Indeed, it was a mess. It was stained, ripped, and the fabric was
degraded in several places. It sat in my
studio for only a day when I set about trying to give it new life while
maintaining the integrity of its past.
What follows is a journey of rebirth.
The tears and degraded areas were mended using 6 ply
embroidery floss in a loose and wide cross stitch pattern.
Close-up
of Mended Section
Since the original, tattered
piece looked and felt to the hand as if it had been either through a fire or had been
buried in the earth, I wanted to convey a sense of hope, even in the most dire
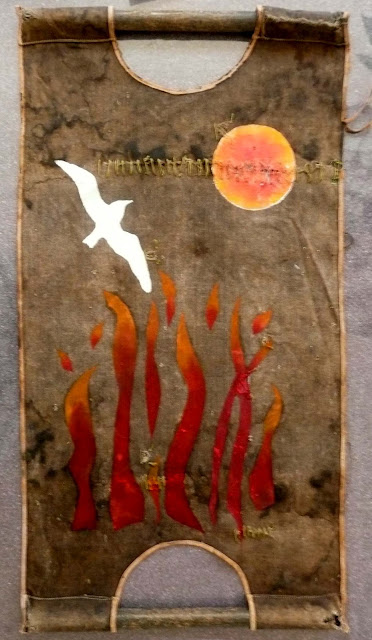
of times. The image of a bird rising
from flames and soaring toward the sun came to mind. I used a craft knife to cut simple flame
shapes from freezer paper to make a stencil and then ironed it to the fabric.
Stencil
Ironed to Fabric
Choice of Flame Colors
Because I used Setacolor
transparent fabric paints they tended to disappear into the dark fabric. I ended up mixing acrylic craft paints into
the Setacolor paints and added a smidgen of fabric medium to the mixture. Even after doing this, the flame shapes were
rather transparent, but when I removed the stencil, I liked the modulation of
color intensity that was produced.
Painting with Setacolor Fabric Paints
Although the semi transparency worked out well for the flames, I wanted the bird form to be opaque so I used Speedball screen printing white ink with a screen that I had made for another project
Screen Printing a Bird Image Using Speedball Screen Printing
Ink
Screen
Printed Bird Form and Stenciled Flame forms
Originally I had planned to only
have flame shapes and a soaring bird shape; however, when I looked at it, I
thought it looked more like a bird escaping flames and that is not what I
intended to convey.
In order to suggest hope, rebirth, and elevation of spirit I cut a circle out of card stock and used it to suggest a sun shape, a light source to which the spirit could reach out.
In order to suggest hope, rebirth, and elevation of spirit I cut a circle out of card stock and used it to suggest a sun shape, a light source to which the spirit could reach out.
Circle Stencil Cut from Card Stock
Since I had already learned that
transparent fabric paints tend to sink into a deeply colored background, I
chose to first apply a layer of gesso using a hand cut card stock circle template as a
stencil.
Layer
of White Gesso
After the gesso dried I first
stenciled around the edge of the circle with Setacolor Orange. While the orange color was still wet, I
applied Setacolor Red to the center of the circle, painted outward and
feathered the red color into the orange color.
A narrow ring of white gesso can be seen and I like that. It adds another visual depth of field.
Sun
Shape Painted with Setacolor Transparent Fabric Paints over a Base of White
Gesso
It wasn’t until I hung the piece
on the design wall to assess what more might be added to this piece, I
discovered that I had printed onto the back of the fabric. At first I thought, drats, I sure goofed on
this piece but as I looked at it further, I began to like the way that the
mending stitches looked on this reverse side and how even the hanging hoop
showed the mended area. Now, I am at
peace with this serendipitous mistake.
Fully
Mended and Painted Scroll
Next I will remove the wooden rods, add batting and a backing to stabilize the piece and then lightly free motion machine quilt this piece before reinserting the rods. When the piece is completed, I will post more about the process and add photos of the work.
Subscribe to:
Posts (Atom)


