Monday, April 28, 2014

Fold, Stitch, Dye - Quick and Easy Shibori with Rit Dye

Here's a quick Shibori project you might like to try.  Be not alarmed by the number of steps I took.  The longest part of this project was waiting for it to set and even that wasn't long.
Finished, quilted project
1.     Fold square of 1090% cotton fabric in half 4 times.  Choose very low numbered tension and increase stitch length to longest.  This will make it easy to remove stitches after the fabric has been dyed.  Stitch in radiating pattern.

Fabric folded 4 times and stitched in radiating pattern
2.     Cover work table with plastic and set up workspace.

              Materials:     2 plastic bins - one for hot water and one for cold water
                                   1 microwave safe bin with lid
                                   1 pair rubber (or other) protective gloves
                                   3 small containers to hold dye and 1 small container to hold hot water
                                   Microwave safe measuring cup (optional)
                                   2 inexpensive, plastic lab pipettes or 3 paint brushes
                                   Microwave safe plastic wrap
                                   1 spray bottle with clear water.
                                   Paper towels or sacrificial fabric for clean-up
                                   Sewing machine (hand stitching optional)
                                   Notions:  thread, seam ripper
                             
Table set-up
4.     Fill bin with very hot water.  Hottest tap water is okay.
5.     Soak folded, stitched fabric in bin of hot water.
6.     Put on protective gloves
7.     Add approximately 3 Tbs. of 3 Rit Concentrated Liquid Dye colors to 3 separate small containers.
8.     Add 3 drops of very hot water to dye in each small container.
These are different colors, but the process is the same as describe herein
8.     Remove folded, stitched fabric from bin of hot water.  Squeeze out excess water.
9.     Use lab pipette or paint brush to apply dye to fabric.  Apply lightest color first.  Allow edges of colors to meet.  I did not take a picture of this step, but I played with an image in a photo editing program to illustrate this step.
10.   Spray Rit Color Stay Dye Fixative liberally onto dyed fabric.  Let sit for 20 minutes so that the fixative can work its magic.

11.   Place dyed fabric into microwave safe container with lid.  Place the lid on top of the container but do not secure it firmly.  Steam will need space to escape.
12.   Heat the fabric for 35 seconds on a high setting.
13.   Remove fabric from microwave and let cool to the touch.
14.   Rinse fabric in bin with cold water.  Squeeze out excess water.
14.   Use seam ripper to remove stitching.
15.   Lay out 2 overlapping lengths of microwaveable plastic wrap in lengths that are longer and wider than the dyed fabric.
Overlapped lengths of microwaveable plastic wrap
16.  Lay the fabric on top of the microwaveable plastic wrap.
17.  Use paint brush or pipette to drop 3rd color into center of each circular shape.
Third color added to fabric
18.   Spray liberally again with Rit Color Stay Dye Fixative.  Let sit for 20 minutes.
19.   Lay two more overlapping sheets of microwaveable plastic wrap on top of fabric.
20.   Fold over all edges to make an envelope.
Plastic wrap envelope
21.   Fold envelope in half.
Envelope folded in half
22.   Fold envelope again.  This packet will prevent the third color bleeding into other sections.
Final fold to prep for further setting in microwave
23.   Place the packet in microwave and heat for 35 seconds to create steam inside packet.  This will further set the colors.
Packet in microwave
24.  Heat the packet in microwave for 35 seconds--NO LONGER!
25.  After 35 seconds in the microwave the packet will puff up.  This is because of
       steam that is created within the sealed plastic wrap packet.
Packet puffed after being heated in microwave.
26.  Carefully remove the packet from the microwave.  It will be very HOT!
27.  Let packet cool for 1 minute and then tear the packet open.
Packet torn open to reveal dyed fabric
28.  Rinse fabric in cold water.
29.  Squeeze out excess water
30.  Lay out or hang fabric to dry.
31.  Iron finished dyed fabric.
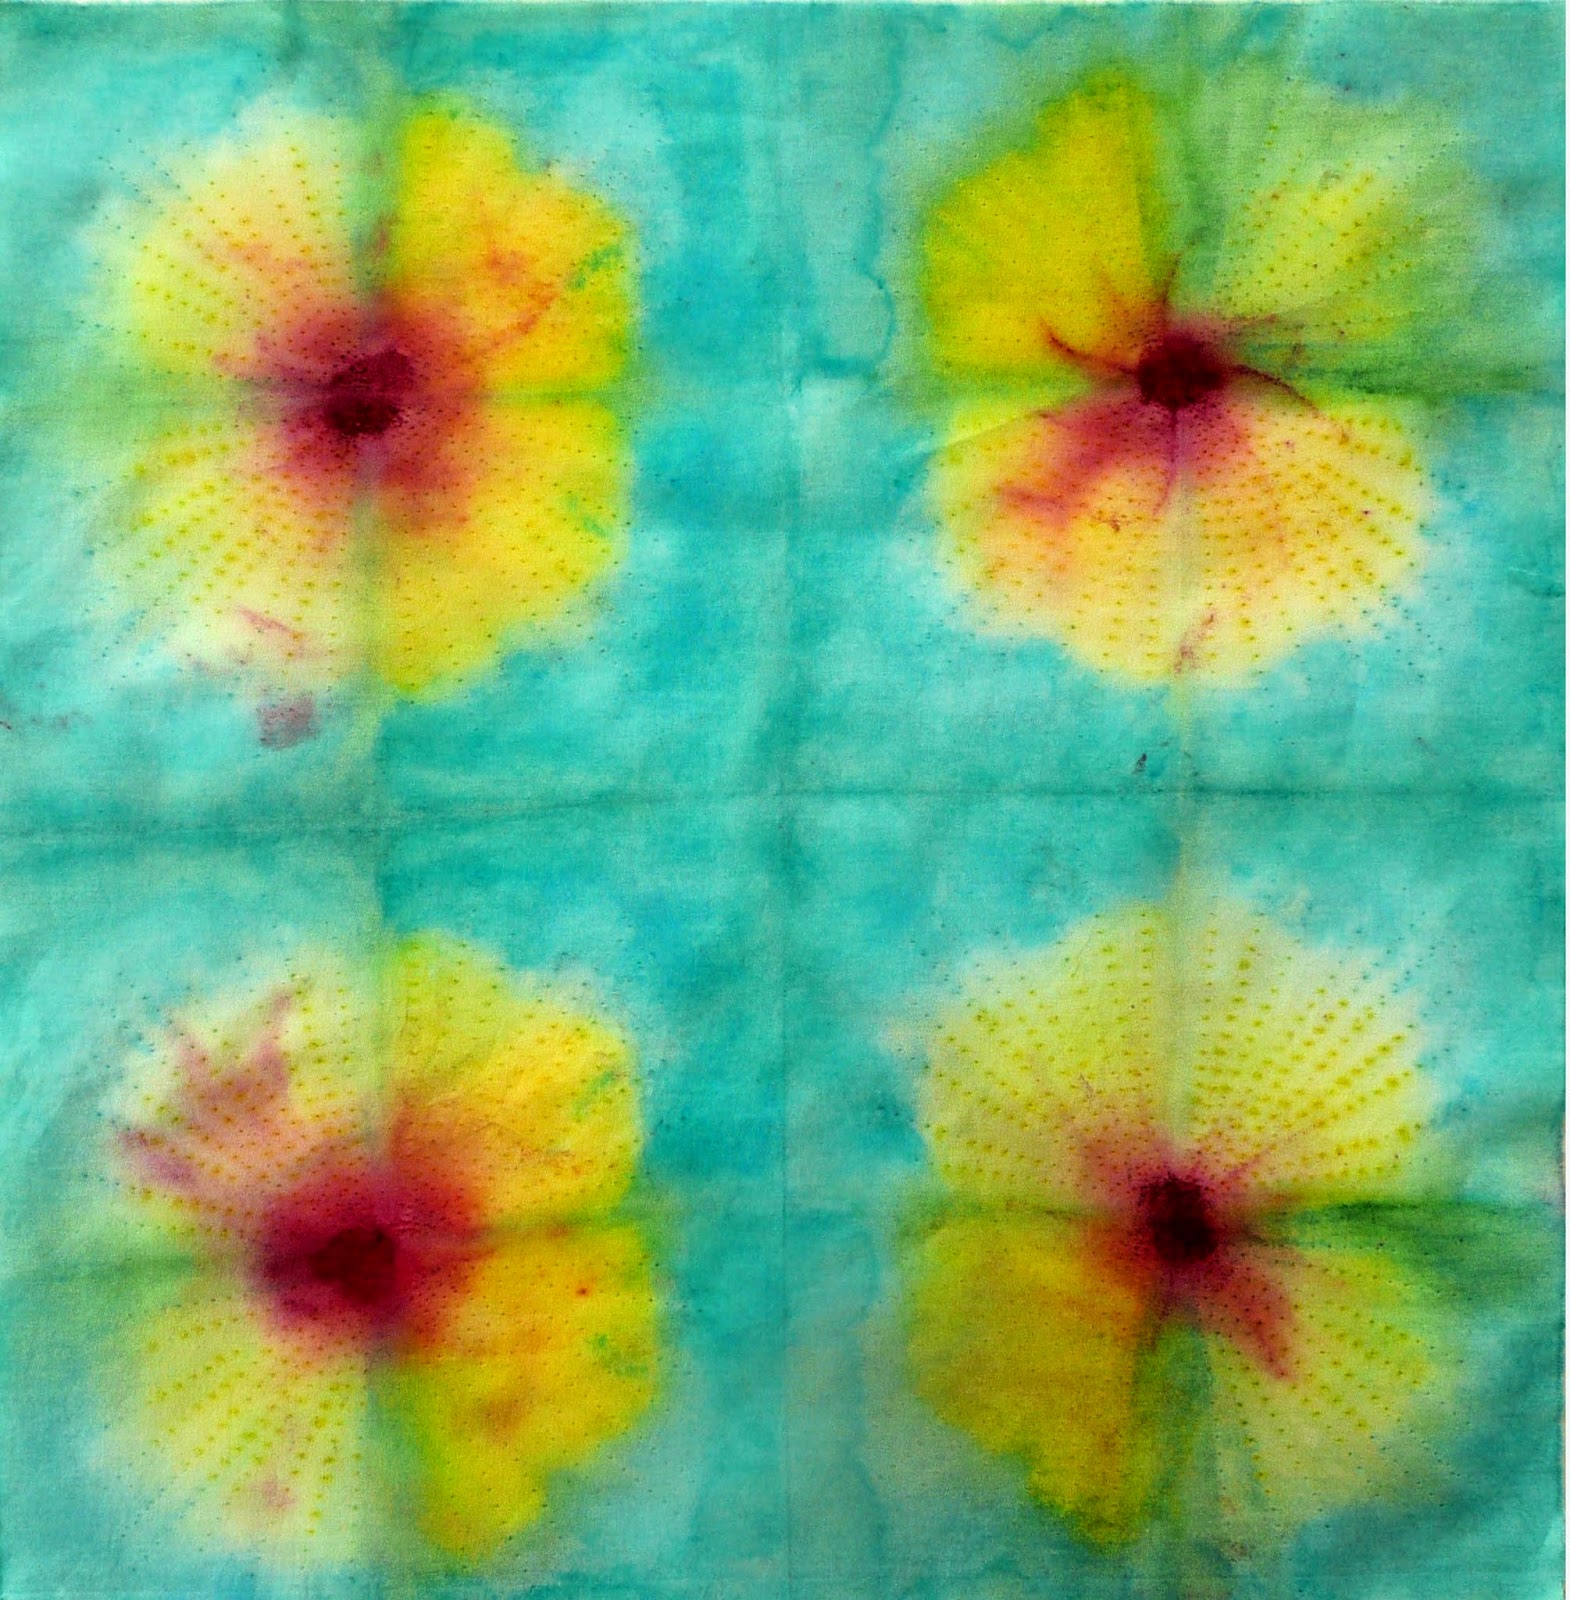
Finished dyed fabric
Whatever colors you opt to use and however you choose to use this fabric, it is sure to be a winner.     The chosen method for this work was to make a pillow-slip quilting "sandwich"; however, it could have been finished in any number of ways ranging from binding it to closing the edges with a zigzag satin stitch, etc., or you might even cut it up and incorporate it into another project.  Once again, here is how I used it.
Front view of dyed and quilted fabric
Back side of quilted, dyed fabric
And always remember, never fear to experiment.  
Sometimes wonderful things happen.
© Linda Friedman 2014.  All rights reserved.

Friday, April 18, 2014

"Homeward Flight" - My 2014 SAQA Auction Donation Quilt

"Homeward Flight" (12" x 12")
The background for this quilt was made by using a method I discovered for applying liquid Rit dye directly to wet fabric.  For details of that method, check out my January, 2013 blog entry.  The circle was cut from a piece of monoprinted fabric that I created from left over paint from another project.  It was then used as a second background. 
Painted Flower Shapes
The flowers shapes were under-painted with opaque, white, Setacolor fabric paint that I ordered through Dharma Trading Company.

Patterns for Circles and Appliqued Flower Petals
I had just gone grocery shopping so I used the paper bag to cut patterns.  The outside edge of the circle that looks like a ring was used to cut a circle from the monoprinted fabric.  It needed to be bigger than the circle in the background because it needed to fit under that circle.

Monoprinted Circle Auditioned Under Background Circle
Slit in Background Fabric...
I had previously cut a circle out of the background fabric to use in another quilt and, fortunately, did not discard the remaining fabric.  I didn't know at that time that I would want to use it for this quilt, but it was perfect for what I was envisioning, so I had to figure a way to obscure the slit.

Petal Leaf Patterns
 When I auditioned the petal shapes, one of the petals was long enough to obscure the slit and after I fused the petals to the quilt, the slit no longer existed.

Adding a Flying Crane
I chose an area to place the crane figure and drew the image onto the fabric with a fine brush and black, opaque Setacolor fabric paint but the body and wings of the bird needed a little help in defining it.  Once again I used Setacolor opaque white fabric paint to define the body and wings.  I only painted white in certain areas because I wanted the monoprint to show through in certain areas of the bird's body.

Cropped Image to Show Close-up of White Paint
I traced around the petal shapes on Mistyfuse backed, white fabric  and "painted" them with Derwent Intense pencils that I ordered from Dick Blick art supplies.  These are great, watercolor pencils.  Color is applied dry and then dampened with a paint brush to make colors behave like watercolor.  Bonus!   They become permanent when dry.   After I colored the petals I cut them out and fused them to the composition.
Petals Fused to Composition
 It was now time to start stitching, but before I could do that, I needed to make a "pillowcase" type sandwich because I didn't want to define the edge with a binding.  Once that was accomplished, I could put the pedal to the metal and start stitching.  I used monofilament thread with a narrow zigzag stitch to connect the inner circle to the background and free motion stitched around each painted flower and over the outline of the crane.  Then came thread sketching on each appliqued flower petal.  Finally, I satin stitched around the monoprinted circle and around each fused and appliqued flower petal.
 
Stitching Around Each Shape
Next came thread sketching on each appliqued flower petal.  Finally, I satin stitched around the monoprinted circle and around each fused and appliqued flower petal.

Thread Sketching and Satin Stitching
 And there you have it...my 2014 SAQA Auction Donation


And always remember, never fear to experiment.  
Sometimes wonderful things happen.


©2014 Linda Friedman - All rights reserved.

Tuesday, April 1, 2014

Preview of Work for Expressions Gallery in Berkeley, CA


Good News.  One of my works, "Dancing Iris" has been accepted into the "Spring Forward" show at   Expressions Gallery in Berkeley, CA from April 26 through July 11.  Below is a close-up sneak peak of one area of the work.   Once the show opens, I'll post a picture of the entire, hand painted, quilted art.
©Linda Friedman 2014
  
What a swell day it has been.  Playing in the studio--painting, printing, dying, stitching and, to top it off, receiving word that one of my recent works has been accepted into a great gallery in a University community of my own home state.   Life is good--let's keep it that way.

And always remember, never fear to experiment.  
Sometimes wonderful things happen.
©2014 Linda Friedman - All rights reserved.

Using Rit To Overdye Cardboard Stamped Fabric

 In the process of straightening up my studio I cut down cardboard boxes for the recycling bin but saw a few box flaps that called out to me to make stamps out of them.   What follows is a description of how the stamp was made and then used to create images on fabric.

Step #1:  I glued cardboard strips to a cardboard backing with wood glue but I imagine any white glue may also be used. 
Step #2:  I used a brayer to apply a dark green acrylic craft paint mixed with equal parts of textile medium to the cardboard stamp.

(I discovered that once the paint has dried on the cardboard, other colors can be applied and different colored stampings can be made.  Bonus!  The stamp can be used over and over again.)

Step #3:  I repeated the stamping 4 times on white cotton fabric .

Step #4:  After the first green stamping was dry, I applied yellow acrylic craft paint mixed with equal parts of textile medium by using an old, plastic shower head as a secondary stamp.

I wish I had taken photos of the following steps, but, alas, I did not.  What had begun as merely an experiment to see if I could get make a useable stamp block with cardboard actually turned out quite nice, but it wasn't until I saw how it was developing that I started taking pictures.

Step #5:  After the second stamping dried, I wet the fabric in almost hot water, spread it out on my protected surface, and used a pipette or lab dropper to randomly apply liquid Rit dye over the entire surface.

Step #6:  After the bluish dye was added, I sprayed Rit Color Stay Dye Fixative on it and let it sit for about 25 minutes.  I then scrunched up the fabric, put it in a microwave safe container with a loosely fitting lid and set the microwave to 35 seconds on normal/high setting.  It is important to note that the steam created in the microwave facilitates the bonding of the dye with the fabric.  Just don't close the lid tightly.  The steam might cause it to pop off and that could make a messy problem

(Note:   Rit Color Stay Dye Fixative can be ordered on-line.  It's a great product and also superbly aids in bonding the dye with the fabric.)

Step 6:  I removed the fabric from the microwave and rinsed it in cold water.

Step 7:  (Almost finished)  I hung the fabric to dry and then ironed it from the back side.  It's a good idea to put a pressing cloth onto the ironing board, just in case any color does come off.  In this case, it did not.
Ta-da!  Here is the finished fabric.

Here is what the back of the fabric looks like.  Now, I can't decide which side I like better.
I was playing around with ideas of how I might use this fabric in an art work and happened to lay the cardboard stamp on top of it.  I rather like the way this looks.  Hmmm, this may have potential.
 Remember, never fear to experiment.  Sometimes wonderful things happen.
©2014 Linda Friedman - All rights reserved.


Friday, March 28, 2014

Demonstrating Rit Dye Application for Quilting Arts TV

Susan Brubaker Knapp and Linda Friedman in Quilting Arts TV Studio
Sometime ago Rit Dye saw one of my blog postings in which I demonstrated a technique that I use with their concentrated, liquid dye products and the company asked if I would to do a demonstration for Quilting Arts TV.  Earlier this week I flew to Ohio and a segment for the Quilting Arts TV Series 1400 was taped with the greatest host, Susan Brubaker Knapp.  If you have not already done so,check out Susan's website, Blue Moon River.  It will surely delight your senses. The Quilting Arts TV Series 1400 in which my segment is scheduled to appear will be released in July, 2014.  What a grand time it was.  The entire staff was not only superbly professional but their welcoming friendliness was heartwarming.

Speaking of "warming", the Ohio adventure presented this Southern California native with snow.  Unbelievable as it may seem, I've never experienced snow firsthand, so  this was quite a treat for me.  When I arrived at the hotel, a wind had brought in the beginnings of a snow flurry.  When one of the hotel managers found out that this was a first for me, she rushed me outside and took a picture.  Any who live in areas that regularly have snowfall, will surely laugh because falling snow is barely visible in the photo.  Still, I experienced falling snow and I was elated.  Now, I'm home and fully appreciating our idyllic weather here in Vista, California.
  
Snow?  Honest, it really was starting to snow :-)
I will post more photos of the taping as they become available.  Until then, never fear to experiment!
©2014 Linda Friedman - All rights reserved.


Wednesday, March 12, 2014

"Appearance of Fall"

"Appearance of Fall"
I'm thrilled to share that my recent quilted, fiber art work, "Appearance of Fall" will be included in the Quilts on the Wall  "Appearances" exhibit at the 35th Glendale Quilt Show.  This annual show will be held for the first time in the Pasadena Convention Center http://www.pasadenacenter.com/ on March 21 (10 a.m. - 6 p.m.) and March 22 (10 a.m. - 5 p.m.)

This promises to be a phenomenal show so if you are going to be in the greater Los Angeles area, try to take it in.  The convention center is located at 300 East Green Street, Pasadena 91101.

All contents of this blog © 2007-2014 Linda Friedman / Linda's Art Quilts  All rights reserved

Saturday, February 15, 2014

Happy Opportunity Came Knocking

I am happy as a clam to share that I have been asked to do a segment on Quilting Arts TV. At this juncture I can't say more, but maybe this picture will be a teaser. As I am able, I will let you all know the whats, whens, and wheres of this serendipitous opportunity.
©2014 Linda Friedman - All rights reserved.

Tuesday, December 17, 2013

"Fiber Reactions" -- Slideshow of SAQA Regional Show

My camera's battery held out long enough to take pictures of all but one quilted art and artist statements and I was able to create a slideshow for you. Here 'tiz...
Click to play this Smilebox slideshow
Create your own slideshow - Powered by Smilebox
Customize a free slideshow

Friday, November 15, 2013

Three Quilted Works Juried into Poudre River Gallery in Ft. Collins, CO

Today I received notice that all three of my submitted works will appear in the Poudre River Gallery in Ft. Collins, Colorado from November 29th through December 28th.  This means that 6 of my 6" x 6" quilted works will be shown in two different states during this period.  Happy, happy day. 

This is a particularly meaningful acceptance for me because my mother and father met at Colorado State University in the mid to late 1920's.  At that time I believe it was called Colorado State Normal School.  Both had fond memories of Ft. Collins and of their college life there, so for my works to visit Ft. Collins it is, indeed, a fine moment for me.

These are the works that will be on exhibit in the Poudre River Gallery show.


All contents of this blog © 2007-2013 Linda Friedman / Linda's Art Quilts  All rights reserved.