Thursday, December 1, 2011

Elf Costume for Adults - Make Your Own Pattern


Although this entry has absolutely nothing to do with art quilts, it was great fun making it.  At this time of year, fun and celebration are the order of the day, so if you need a costume for a holiday party, you might have a go at making something like this elf costume.

My daughter is hosting a holiday "Ugly Sweater"/Costume get together at her home this month.  Since all my outlandish holiday sweaters have gone their way to charity, I started looking on-line  for something funny that I might wear.  My, oh my, the prices were outlandish so I resorted to Plan B and headed for my stash of fabrics.   I had lots of green and red felt and left over faux fur from another project and that was the start.


Elf Hat with Ears
All I did for the elf hat was measure around my head for the opening and then cut two sides of a modified cone shape from red felt.  The triangular pieces were cut from scraps of felt and sewn to the cuff of the hat.  I did make a pattern for the felt ears so I can show how they were made here.

ELF EARS

Ear Pattern
The dotted lines were the cutting line and all other lines were indications of where to stitch.

Ear Pattern Pinned to Felt

Ears Turned Right Side Out and Lightly Stuffed

Topstitching Around the Edge of the Ear
to Form Contour

Turning the Edge Before Stitching the Spiral

The ends need to be turned in before stitching the spiral or the entire edge will not turn in as a final finishing step.

Ear Ends Turned and Pinned After Spiral is Stitched
(Spiral is turned the opposite way than it is on the pattern)

Completed Ears
The completed ear units were sewn to the elf hat by hand.  I found that placing them about 1/2" forward of the two side seams of the hat worked out well.

Vest

I did not make a pattern for the vest.  I merely laid a sweatshirt that fits me on top of two layers of green felt, marked the felt with chalk and then cut it out.  I cut up the middle of what would become the front and then folded back the cut edges and pressed both sides to look like lapels.  I stitched from the bottom of each side to where the arm holes would be and then cut a bit of an angle at the bottom of the armholes so that square corners would not be sticking out.  The garment underneath the vest is a sweater that I have in my closet.  The red, green and yellow triangles are the same size as those that around the edge of the hat and were topstitched with a fancy stitch .  Wa la...an elf vest.

Pants

I didn't have red pants in my closet and I don't believe I probably ever would buy any so, once again, Plan B was activated.  Catholic Charities Thrift Shop had a pair.  They were too big, but a little taking in of the side seams was all they needed.  The rest was a cinch.  I used some faux fur remnants and hand stitched them to the outside of the hem.  Bonus!  The pants were a bit short so this worked out just fine.


Shoes

I found a pattern on the internet but when I cut it out, it was for a child's foot.  Oops.  What to do?  Geez, another Plan B had to be worked up.  I took a pair of flat shoes from the closet, laid them on paper, drew around the sole and cut out the pattern about 1/2" larger than the sole of the shoe so that I can wear these elf shoes over my real shoes.

Elf Shoe Sole Pattern
(cut 2)

Elf Shoe Side Pattern 
(cut 4)

I had to make sure that the distance from the point at which the toe curls up to back of the heel was the same length as the distance from the center of the sole toe to the center of the sole back.

Cutting the Pattern

I doubled red felt pieces and cut out the side pattern twice.  It would have been nice to be able to have 4 layers of felt and cut through them all at the same time, but that stack would have been too thick to cut neatly.
Sewing the Shoe Top

Next, I sewed a 1/4" seam from the dot on the mid point of the top, around the toe, down the bottom and back up to the dot on the middle of the back.  Then the felt was cut back somewhat close to the stitching line.
Sewing the Sole to the Shoe Top

Working right sides together I first pinned the center of the sole toe to the center of the shoe top unit at the dot below the toe begins to curve.  Then I pinned the center of the sole heel to the center of the shoe top unit at the dot at the bottom back.  Next, I pinned around the entire edge and then sewed the sole to the shoe top.  The edges were then clipped close to the stitching line and the entire unit was turned right side out.

Folding Down and Securing the flaps


Two pictures are provided to show how the flaps were folded.  First the flaps over the top of the shoe were folded back.  Then the two tips of the flaps were folded back to the center and stitched in place.  A star and little bead cover were added as embellishment, as was the gold cord bow, and the dangling, plastic "crystal".  The two flaps at the back of the shoe were also folded over and pressed in place to make a back cuff.

Rubberized Outer Sole

Since these felt "shoes" are going to be worn over street shoes, and since they will be subjected to a variety of walking surfaces, they needed to have a non-slip bottom surface.

A friend gave me a piece of black rubberized shelf liner that I used for the sole.  I used the sole pattern but cut it a smidgen smaller so that it would not show on the front of the shoe and I glued it to the bottom of the shoe with  a product called Professional Welder that works on myriad surfaces.  

Hoorah!  I'm ready for the party.  


Saturday, November 19, 2011

Screen Printing with Window Screening Material


Using Window Screening Material to Make a Screen Printing Tool
 
Background:  After constructing wooden framed screens to cover vent holes on one of my houses, a small rectangular piece of screening remained.  It lay on my kitchen counter for days before I figured that it could be used someway in an art project.  Today a light bulb went off and it seemed like a perfect little piece to experiment with making a screen printing tool with readily available materials.  Here is how it progressed.
 
I'll start with the completed screen and work backward.
The project began with a piece of 2 ¾” x 9 ¾” screening material.  At first I zigzag stitched a narrow border of self adhesive metallic material around the edge to give the screen stability. 

Then I stuck a few pieces of Scotch™ tape to what became the back side of the screen. These would act as resists when ink was pulled across the screen. After one pull of silk screen ink, I could see that it needed a wider border to reduce the risk of extra ink going over the edges onto fabric and to increase stability.

I used wide aluminum tape on the front and then turned the piece over and applied the same  tape over the sticky side of the tape on the front. A screen printing tool emerged. 
I had a piece of fabric that already had some “smooshed” color on it, so I figured this would be a good piece on which to audition the effectiveness of the new tool.This close-up photograph shows the result of two ink screenings. 

The purple print was done with only a narrow metallic tape border.  Because stability was compromised, the image edges are not crisp.  The yellow print was done with the wider metallic tape border and the edges are very crisp and clear.  The screen grid is visible on both and provides additional visual interest.
Now I want to make a larger screen printing tool for which I will use a wooden frame and staple the window screening material to the frame, similar to the way in which silk screen is attached to a wooden frame. 


Monday, November 7, 2011

Adopted Practice Piece

A couple of days ago my neighbor brought a visitor to my studio to look at some of the things I've been working on.  During the course of their looking around and talking with me about processes, the visitor's eye fell on a small practice quilt sandwich that lay beside my sewing machine.  She couldn't stop talking about it so I thought if she liked it that much, she could have it.  After all, I'd just been practicing some ideas for free motion quilting.  I'd even tried using bobbin thread in one area and it didn't work, so I used that opportunity to free motion scribble words around it to remind me not to try this on the large work that was in progress.  She said she didn't sew and asked me if I could put a backing on it so that she could use it as a small pillow cover.  The next morning I made a backing with buttonholes and buttons and, ta-da, here it is.
It never fails to astonish me when something like this makes such a hit.  What a great reminder it is to step back sometimes to gain perspective.

Sunday, November 6, 2011

More Sticky Backed Craft Foam Stamps

It would seem that there are limitless possibilities when it comes to creating stamps from sticky backed craft foam.  Here are a few more that I've made recently.  I can visualize them being used as background images and also images to punctuate a theme.  Often I will stick two layers of uncut foam together to make a thicker stamp and then cut through the two layers. If any ink or paint finds its way to the mounting surface, it will be less apt to print when pressure is applied during the stamping process.

Here is an experiment with making a hand shaped stamp.

Here is yet another stamp.  This one was made with the kind of foam that can be heated and pressed into (or onto) another form.  The great part of using this foam is that it can be reheated to lose the image and reused for another image.  This particular stamp was made by pressing the heated foam into a copper food mold.

The ouside of the copper mold was used in this image.

This stamp came from pressing the heated foam into the inside of the copper mold.

Tuesday, November 1, 2011

Craft Foam Stamps

A few days ago I was cutting some random shapes from sticky back art foam to create an overall design for use in background printing on fabric and came up with this stamp.
Oooo, I liked it and couldn't leave well enough alone so I sorted through my original silk screens and found this bird that I thought might look good superimposed on a print with these wavy lines.

I merely wanted to see what my idea would look like so I set about pulling out of my stash the first piece of pre-cut fabric hat I laid my hands on.  Since red Speedball screen printing ink lay on the worktable, I used it to make the first print of the wavy lines. 

Ooops!  I got a smudge of the red ink below the lines.  Time to get creative.  A couple of pieces of cardstock were right at hand and I covered the smudges with stenciled red lines and then echoed those lines at the top. 

 Mmmm.  I did like the way it looked and had a hard time waiting for the print to completely dry.  After it was dry and heat set, I laid the embroidery hooped screen on top of the wavy lines and pulled white Speedball printing ink across it.  Yes!  I liked that, too. 

Still, I couldn't leave well enough alone.  Dharma Trading Company had just delivered a bottle of Setacolor Silver Glitter Finish.  After the white Speedball ink was dry and heat set, the bird form received a coating with the paintbrush of the glitter finish. 

Then came the completely spontaneous act of quilting of the top design atop batting and another fabric that heretofore had not found a proper use. This was good but the design needed to be set off somehow.  Out came the glass beads and the handwork began, bead by bead and, hoorah!  A 15" x 15" finished piece.

Here is a closeup of the quilting, the stamping and the beading.

...and the backing...

A few more stamps were created that day, but they will be posted at a later date.  Until then, I must get this listed on Etsy.

Saturday, October 22, 2011

Hoorah! My "Health" Mojo Doll Is in an Etsy Treasury

It's another fun day for me.  I received an e-mail communication that the Etsy Shop, MamaLovePerfume, listed my "Health" pocket mojo doll in a wellness and well being Etsy Treasury.

Here is a link to the full Treasury:
www.etsy.com/treasury/NjAyNzA1NXw5MzU2MTY2OTM/wellness-and-well-being

and
here is a link to my full listing.
http://www.etsy.com/listing/67696277/health-mojo-pocket-doll

and...Ta-da!  Here is my "Health" mojo pocket doll.

Health Mojo Pocket Doll

Health Mojo Pocket Doll

Over time I have made several different mojo pocket dolls from treasured fabric remnants for the bodies, Sculpey Clay for the faces, embossed aluminum for plaques and tidbits of beads and other ephemera for the embellishments.  Each little doll has its own stitched and hand painted felt carrying purse and each is finished with buttonholes and metallic buttons.  It always makes me happy when someone enjoys one of these diminutive works.

Saturday, October 15, 2011

My Pink Boa Is In An Etsy Treasury


It was fun to learn that MirroredSkyCreations featured my pink boa in her Etsy Treasury today.  You might want to check out some of the other items in this treasure at: 


Tuesday, October 11, 2011

A Peek into Journal Pages

Although I currently have several journals in progress this video provides a peek into some thoughts that have actually developed beyond the journal into art quilts, wearable art, and even short stories.  Some of you may have seen the needle felted and quilted "Henry" quilt and the "Gates" quilt that was submitted as a Quilts on the Wall challenge.

Roxio is having trouble with their program tonight but when it is cleared up, perhaps I will be able to post the slide show without your having to click on this link:  http://www.photoshow.com/watch/Ty6Zm5du


I'll revisit this entry tomorrow and if the link fails, I'll just post the journal pictures.

Tuesday, September 6, 2011

Using Gel Medium to Block In a Silk Screen

Just found this little tutorial in the on-line Art Trader Magazine about using gel medium to block in a silk screen.  I believe the author called it Guerilla Screen Printing.  http://www.arttradermag.com/how-to/guerrilla-screen-printing/  I'll write a follow-up on how well this works once I have tried it.  Would like to include pictures here, but don't want to infringe on a copyright.

Flight - A New Art Quilt on Etsy

Flight
If you follow my blog you will notice that this piece started a few weeks ago with the background.  The next stepo was the silk screening of the bird figure.  After I discovered that I could apply handwriting without "bleeding" on the fabric, this work developed.    It can also be found on Etsy at:  http://www.etsy.com/listing/81239864/flight-art-quilt-wall-hanging.

Close-up of Silk Screened Bird and Apple Stamped Circles

 Full View of Front

 Close-up of Stylized Sky Elements

Close-up of Handwriting 

Full View of Reverse 

Close-up; of Reverse 


Monday, September 5, 2011

Tea Bags, Checkerboards and Birds - The Final

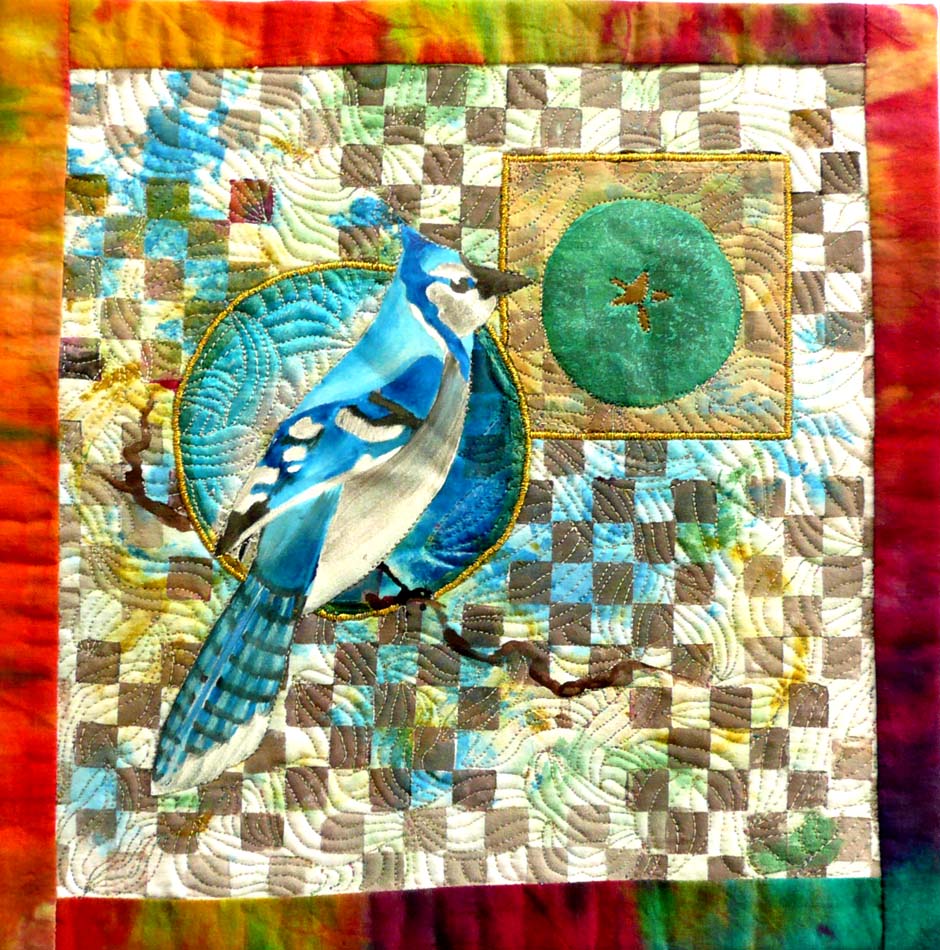
The blue jay is finally finished.  Because the bird became somewhat lost on the busy background of squares, I drafted a circle around it and then filled it in with Jacquard luminescent textile paints to provide a contrast that would make the bird stand out.  Satin stitching around both the circle and the tea bag was done to provide a unified focal image.  The borders and reverse are made from a hand dyed fabric.  Since there was only a little of the hand dyed fabric left after the borders and backing were done, the hanging sleeve needed to be pieced.

Now, it's on to working on a piece with some writing on it...

Finished Tea Bags, Checkerboards and Birds

Close-up of Bird and Circle
 
 Reverse

Label

Reverse - Close-up of Quilting

Sleeve

Close-up of Stitching around the Jay

Sunday, September 4, 2011

Writing on Fabric

Writing on Fabric with Plaid's Tip-Pen Essentials

Finished writing
I have been experimenting with various methods of adding the written word to fabrics, but until now, the results have been sketchy to say the least.  Recently a friend let me use a product that she had not yet tried and I believe it is going to offer some reasonable results.

As a trial, I stretched a scrap swatch of nylon voile into an embroidery hoop and elevated the hoop a bit to keep the paint from seeping through the fabric and smearing.  I then squeezed some plain acrylic craft paint into one of the smaller bottles, screwed on the plastic applicator tip and then screwed on one of the metal tips.   I then began writing--something...anything.  Before me was a partial dictionary definition of the word, "art", so that is the reason behind this.


This is the Tip-Pen Essentials product by Plaid that I used.

 Here is everything that is included with the product.
There were 3 plastic bottles with plastic applicator ends and caps
and several different sized, metal applicator tips.

Close-up of applicator tips

Voile swatch stretched in embroidery hoop.
The ease of application and the results are now leading me to search on-line for this product so that I can return the applicator to my friend.  Presently I have a silk screened piece hanging to dry and am planning on adding writing to it.  I'll put it on the blog for your review whether or not the results are successful.