 |
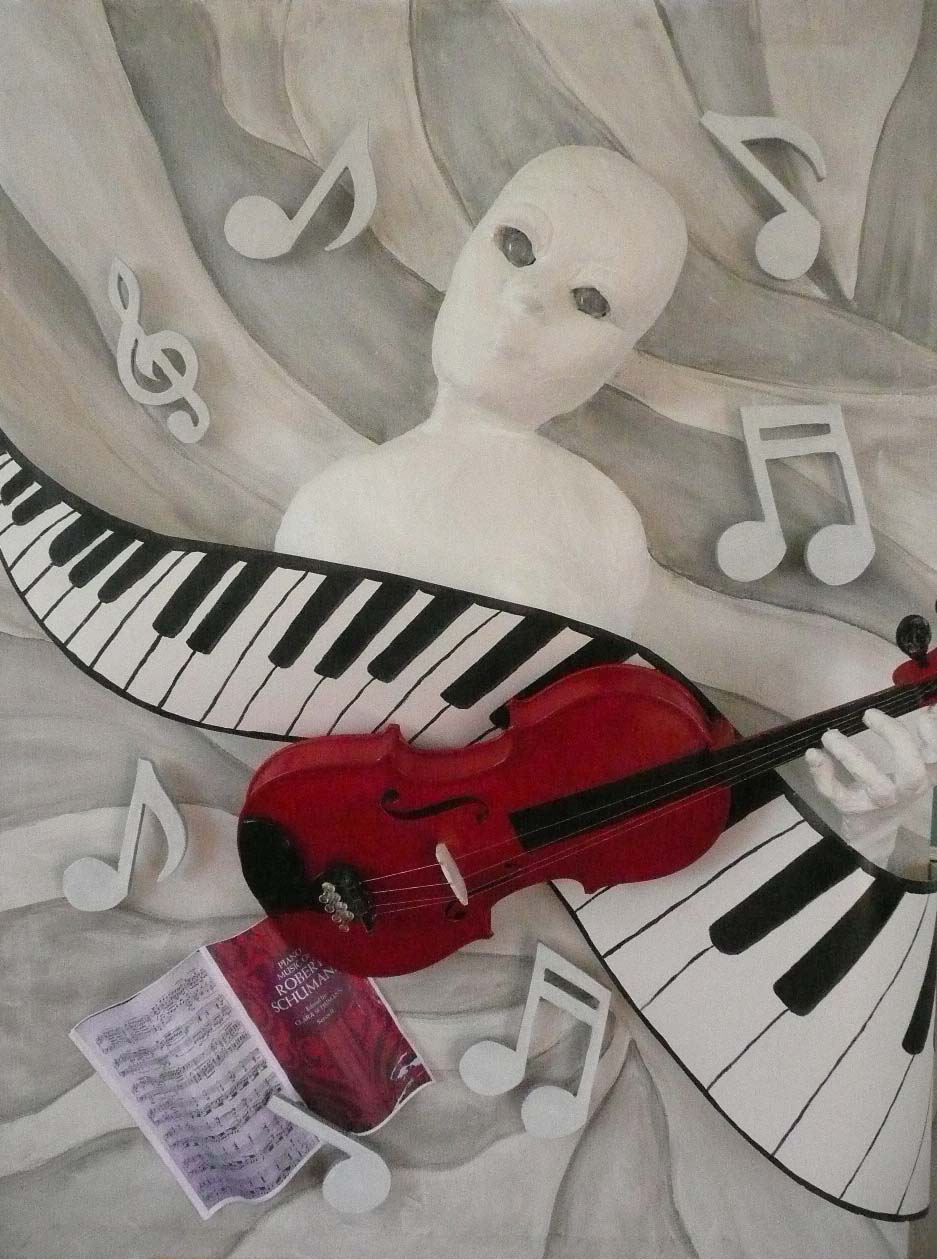
| "Tonal Recall" ©Linda Friedman 2013 (30"x40") |
I'm posting this for those of my blog followers who have not seen my Facebook page about this,
A while back I was given the bare bones of an old, overly loved violin and was asked by
Deborah Stanley the Media Director for the New Life Arts Project it to create a work of art for the Project (NLAP) for the Smart Foundation and VSA. Because I wholeheartedly believe that the visual and musical arts serve to heighten awareness and potential. Because this project aims to empower the disabled through music and art, I was totally honored to accept this challenge.
When I received the damaged violin, I wasn't sure whether I should just use the violin or incorporate it into a larger work. As I started to organize my thoughts about this, I set up a still life comprised of disparate things from my studio and there it sat for a few weeks as my mind mulled over possibilities.
 |
| Still Life Set Up for Inspiration |
When I finally decided that I wanted to feature the violin in a larger work that could be hung on a wall, I set to work. First, I bought a gallery wrapped artist canvas. That's when the "fun" began. I knew the elements that I wanted to add to the canvas were going to be rather heavy, so in order to eliminate the potental for the canvas sagging, I added plywood to the back side of the canvas.
 |
| Plywood Backing to Canvas |
A few years ago I had constructed a papier mache bust on a stand. I extricated it from the stand and used one of my father's old hand saws to cut it in half so that I would have a flat backed front.
 |
| Bust Form Sawed in Half (Looks a bit creepy, doesn't it?) | |
|
Next came the head.
 |
| Building Up a Facial Substrate with Papier Mache (Another creepy stage :-) |
I had the face mask in my collection of studio ephemera so here it is with a papier machie substrate that would fill the mask and give it substance.
 |
| Face Mask Filled with Papier Mache (There, that's better...not creepy now) | |
|
Digging my finger into each eye socket to make holes to receive eyeballs was a rather macabre activity, but wait until you see how bolts were drilled through these spaces. Even I was squeemish about doing this :-)
Once the torso and the head were sufficiently dry and hardened, I glued the elements to the canvas with construction adhesive.
 |
| Construction Adhesive Used to Adhere Form to Canvas |
After the torso and head were adhered to the canvas, I compressed the torso to a depth that would accept the violin and then drilled a 3" bolt through the canvas and the plywood backing.
 |
| Torso Bolted to Canvas and Plywood Backing |
|
Now comes the really creepy part--bolting the head through the eyeball sockets...
 |
| The Head Was Secured to the Canvas and Plywood Backing with 3" Bolts |
|
|
 |
| Head Bolted Through Eye Sockets and Into Plywood Backed Canvas |
At this juncture the figure needed a covering of
plaster cloth skin to integrate all the elements
 |
| Plaster Cloth Unrolled, Cut into 4" to 6" Pieces, Wet and Applied in 3 Layers to Entire Figure |
After the plaster cloth was completely dry and hard, I painted the figure with 3 applications of gesso. A coat of white acrylic paint and sealer completed the torso and head. Then the background was painted to loosely suggest stage draping.
 |
| Background Painted in Greys and Whites |
|
The eerie hollow eye sockets definitely needed to be addressed. I wanted to use shooter marbles but I didn't have two of the exact same color so this didn't work. Instead, I made eyeballs and eye lids from
Sculpy polymer clay.
.jpg) |
| Glue Added to the Eye Socket Spaces |
 |
| Eyebrows and Eyeballs in Place. (Next the blank stare had to be addressed) |
 |
| Eyeballs and Eyelinds Painted, Shaded and Highlighted. (Waalaa, no more blank stare.) |
FINALLY, FINALLY, I was able to address the violin. All of the foregoing was created to showcase the violin.
First, I painted the body of the violin red and painted the neck black and extended the black onto the violin body to suggest it's orginal fingerboard construction component.
 |
| Violin Body and Neck Painted Red and Black |
|
Since the violin lacked all original construction elements, I constructed the tailpiece, chin rest and bridge out of
Sculpey polymer clay and painted them black to suggest the original components of the violin.
 |
| Tailpiece, Chin rest and Bridge Made from Polymer Clay | |
|
Since only one peg came with the bare bones of the instrument I also needed to create 3 additional pegs.
Initially, I considered using strings made of silver bugle beads, but when I auditioned them, they were too glitzy for such an originally elegant instrument, so I settled on making strings from silver thread.
 |
| Silver Thread Tied to Each Peg |
 |
| Silver Thread Pulled Across Polymer Clay Bridge, through the Fine Tuner of the Tail Piece and Anchored with Push Pins |
Here is the final stringing.
Oops... The stylized keyboard is photo bombing this picture. This is a good time to explain how I made that element.
I first did a freehand drawing of how I wanted the keyboard to flow across the work.
 |
| Freehand Pencil Drawing of Keyboard |
 |
| Outdor Vinyl Flashing That Will Become the Keyboard |
|
|
 |
| Transfering the Drawing to Vinyl using Carbon Paper |
I had to find a paint that would adhere to vinyl.
 |
| The Keys were Masked and Painted |
 |
| The Keyboard is Painted and Ready for Cutting from the Vinyl |
As this picture shows, always the violin remained in the forefront of my vision and, thus, never allowed me to lose focus that the violin was most important, not the elements that would showcase it.
In front of the violin is a booklet I made of a musical score. It has several pages that were copied from an old Schumann book of music, glued together, stitched down the center and then molded to simulate a book in use. It would later be affixed to the canvas with strong glue but looks like it was stitched to the canvas.
 |
| Musical Score |
It was now time to affix the violin to the canvas. I drilled two holes, one through each of the "F holes". Through those holes I then drilled holes through the torso and the plywood backed canvas to accept 3" bolts. Each bolt was then capped off on the reverse side with tightly fitting nuts on the reverse side.
 |
| Picture shows one hole to accept a bolt, one bolt ground down to nut, and one bolt needing to be ground down. |
|
These bolts would later need to have excess removed with a hack saw and finished with a hand grinder. To further secure the bolts and to assure there were no sharp edges, each bolt and nut was covered with several applications of
Plasti Dip rubber coating that I purchased from
Lowe's.
Once the violin was in place, a hand could be constructed to suggest the figure playing the instrument. I first constructed a hand armature from a wire coat hanger and pipe cleaners. Enough wire coat hanger material was left uncovered so that it could be inserted through the plywood backed canvas.
+armature+with+pipe+cleaners+and+hangar.jpg) |
| Hand armature |
The armature was then covered with a layer of papier mache strips, allowed to dry and finally covered with a build up of plaster cloth.
 |
| Papier Mache Covered Hand Armature |
The hand was auditioned on the work to establishe where the fingers would fall on the neck of the violin. Holes were drilled through the plywood backed canvas and the protruding coat hanger wire was inserted through the holes and finally bent back to secure them to the plywood.
I then drilled holes through the fingers and the neck of the violin and threaded wire through the holes to hold the fingers rigidly to the violin.
After the violin and fingers were solidly fixed, I wove the keyboard element over the hand and behind the violin. The ends of the keyboard were secured to the canvas side with
Weldbond a glue that rightfully claims to bond to most anything--and it did a great job. The keyboard will not come loose. It is permanently attached.
At this juncture, I thought the work was complete but as I looked at it over the next few days, I realized that wat it lacked was music, so the birth of notes emerged. I made paper patterns, traced them onto plywood, cut them out with a band saw, primed them, and base painted them. I then countersunk holes in two places on each note to make places to accept bolts. Because I wanted them to stand out from the canvas, I cut 1/2" lengths of narrow copper piping through which the bolts would travel behind the notes. Each note was bolted through the plywood backed canvas and secured with nuts. More grinding and covering nuts and boths with Plasti Dip followed. I then had to fill the countersunk holes with wood putty, let it dry, sand each filled hole level with the note and then repaint each note a gloss white.
 |
| Side of Note Showing Copper Pipeing Risers |
FINISHING THE WORK
 |
| Backing Added, D-Rings Attached, Hanging Wire Secured and Label Attached. | |
|
And here is the postcard that that was posted on the
VSA events web page . I was totally thrilled to see my violin work in this promotion of the reception and auction that will be held on October 12, 2013.


.jpg)


+armature+with+pipe+cleaners+and+hangar.jpg)




+-+%232.jpg)


.jpg)
.jpg)


