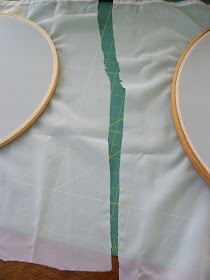
Materials:Wooden embroidery hoops of any size
Sheer window curtain
Pliers
Scissors
1) Lay sheer window curtain material over the smaller, inside hoop of a two-part embroidery hoop and then place the larger hoop over this and push down to secure the sheer material inside the hoop.

 2) Locate the tightening screw on the embroidery hoop.
 3) Tighten the screw.
 4) Turn the hoop over and pull the screen fabric from the back side of the hoop to make screen side tight. Go around the entire circle, pulling as you move the hoop.
 5) Continue tightening the screw
6) If you happen to have several embroidery hoops, you may use this time to make more than one screen. Various sizes of hoops determine the size of the screen printing images that can be made, but these can be very handy for smaller designs.

This hoop was a very inexpensive one that was originally sold for $200 but was purchased at a local thrift store for 50 cents.

7) Repeat the process from #1. (Lay sheer window curtain material over the small, inside hoop of a two-part embroidery hoop and then place the larger hoop over this and push down to secure the sheer material inside the hoop.)

8) The less expensive hoops have a small tightening knob that may initially be tightened between the thumb and forefinger, but effective, full tightening needs to be done with the aid of pliers.
9) Repeat the process from #4 and #8 (pull from reverse to make fabric tight in the hoop and continuously tighten as you pull fabric taut).

10) Cut the assembled hoops away from the main panel of sheer curtain fabric.

11) Lay the prepared hoops flat on the work surface.

12) Separate the assembled hoops. Leave a generous margin around the hoops. This will allow enough fabric to make tugging and retightening easier, should the fabric become slack in the hoop.
 13) Even small hoops may be used.

14) Here are examples of various sized hoops that have been prepared for screen printing.

15) ...AND oodles of curtain screen fabric remains. Ahhh, the potential is invigorating.


OK, this was interesting--but you didn't show us exactly how do use the hooped fabric to make an actual Screen printed item.
ReplyDeleteThanks for your question. Here are links to two other of my posts that illustrate how to make a screen print. The first shows how to apply the paint mask and the second one shows the actual printing process and examples.
Delete#1. (May 29,2010 post) https://lindasartquilts.blogspot.com/2010/05/masking-embroidery-hooped-screen-with.html
#2. (May 31, 2019 post) https://lindasartquilts.blogspot.com/2010/05/printing-with-embroidery-hooped-silk.html
Awesome! Informative Blog having nice picture sharing . Thanks a lot. Embroidery Digitizing Calgary
ReplyDeleteInstant promo products Calgary
I have read your article and this is really an amazing post for increasing skill in this concern department.
ReplyDelete
ReplyDeleteVery good work
This is an amazing article for all the newbie of embroidery field and you have mentioned complete embroidery things in this blog with efficiency Appreciated!
ReplyDeleteThis is really a great tutorial on How to Make Screen printing frames with embroidery hoops.. Keep up the good work Linda..
ReplyDeleteNice Blog ! Thank you for your very nice articles. I look forward to visiting your site in the future!
ReplyDeleteOutstanding tutorial Linda, really appreciate it :)
ReplyDeletehi there am Lisa if you are looking for the best embroidery design and artwork then
ReplyDeletevisit our website now abc www.xyz.com
This comment has been removed by the author.
ReplyDeleteTotally! Making your debut in Anime Embroidery Design is a blast! Start by selecting a character that resonates with you, one that's got defining features. Keep it manageable with clean lines and basic stitches. Experimenting with colors and thread types adds that extra oomph. Have a blast crafting your Anime Embroidery Design masterpiece.
ReplyDeleteLove this DIY screen printing frame method with embroidery hoops! It's budget-friendly and innovative. To further enhance your projects, consider exploring custom embroidery digitizing for unique designs.
ReplyDelete
ReplyDeleteLove this screen printing..
realistic embroidery, 3d and more customization.
ReplyDeleteFind top-notch screen printing services near you for custom designs, fast service, and local expertise!
ReplyDeleteGet fast and reliable Same Day Custom Printing for all your urgent design needs!
ReplyDeleteThis is really great!
ReplyDeleteso pretty and nice.
ReplyDeleteRealistic embroidery!
ReplyDeletescreen printing and embroidery screen printing and embroidery is a process that involves transferring ink onto a surface, typically fabric, through a mesh screen. The design is first created on a stencil, which is then laid over the screen.
ReplyDeleteWonderful!
ReplyDeleteGreat blog!
ReplyDeleteRealistic embroidery!
ReplyDeletePrefect embroidery skills!
ReplyDeleteElegant work!
ReplyDeleteSuperb art
ReplyDeleteAppreciate your skills!
ReplyDeleteAmazing work!
ReplyDeleteGreat!
ReplyDeletenixce blog
ReplyDeleteAppreciated!
ReplyDeleteGreat Article!
ReplyDelete