Showing posts with label free motion stitching. Show all posts

Sunday, May 28, 2017

Thread Drawing - Wading Bird

Today I just couldn't bring myself to toss a remnant of painter's drop cloth so I thought It might be a good pallet on which to practice some improvisational, free motion thread drawing.  Since the remnant was long and narrow, whatever I drew seemed to beg to be elongated.  What better than a long legged wading bird?  This is what emerged.
Here are a few close-ups to show the stitching.
Even though I used two layers of stabilizer under the canvas, the dense, free motion thread drawing tended to make fabric outside of the edges of the bird image become somewhat "rumpled".  To salvage the thread drawing, I cut around it and then zigzag stitched it onto another canvas remnant.  That did the trick.  Because canvas tends to fray terribly, I applied a thin layer of Weldbond glue around the edges and spread it thinly with a soft bristle paint brush.  The glue dries clear and is no problem to stitch through. 

And, once again, here is the finished bird.  I used a silver Sharpie pen to color in the bill.  When completed, I hemmed both the top and bottom edges and left the ends open so that those spaces would accept a small dowel rod.  In my stash of laces and pipings, etc., I found a length of braided cotton cording that seemed to work perfectly for hanging.
Always remember, never fear to experiment.  
Sometimes wonderful things happen.
© Linda Friedman 2017.  All rights reserved

Tuesday, February 23, 2016

Fashioning Thread into a Large Rigid Bowl

It's my theory that anyone who works with needle and thread also has a goldmine of clipped threads that too often make their way to the trash.  I collect my threads in a paper lunch bag that is taped to the edge of my sewing table. 

In the past I've made scarves from stitched thread, yarn cuttings and water soluble stabilizer but recently I had a lot of clippings and wanted to work them into a large, dimensional work and thought that a bowl might be a good starting place.

Here is how I made this large, 21" diameter bowl.

I first sorted threads according to colors and how I wanted them to appear on the bowl.  I also had a lot of white left over threads that I wanted for the center of the bowl but they do not appear in this picture.

Here is the stabilizer I used as well as some of the threads I used to stitch the bowl.

Next I cut two large square layers of water soluble stabilizer and placed the threads in circular layers onto the stabilizer.    I then cut 2 more layers of water soluble stabilizer and placed these layers atop the threads.  I used 4 layers of stabilizer because I did not want to use an embroidery hoop on this large a project.

After placing the threads between the stabilizer, I pinned all layers together.
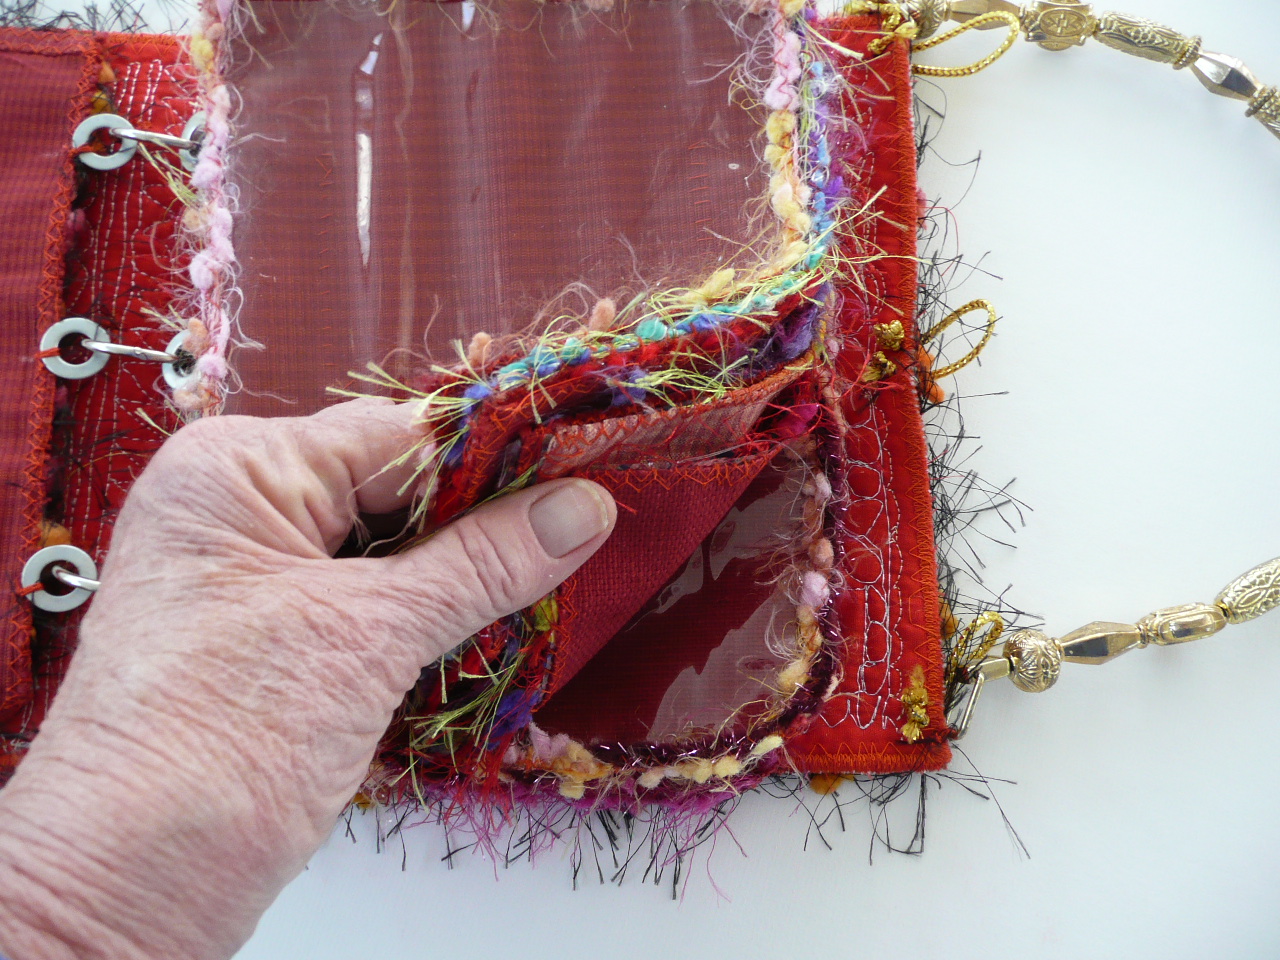
Here I have separated the layers to show how the threads are layered.
Once all layers were pinned, the layers looked like this.
I started free motion stitching with overlapping, free form circles over the green thread clippings.

NOTE:  All stitching needs to be overlapped so that the form does not fall apart when the water soluble stabilizer is rinsed out.

Here is what the basis of the bowl looks like when much of the circular areas have been stitched.
The center was the last to be free motion stitched.

Once the center was stitched, I drew long, spiky leaf shapes radiating from the middle of the circular form.  I then started filling in the shapes with a close, free motion, zigzag stitch.  The next picture shows the beginning.  After all dark green shapes were filled in with stitches, I mirror stitched lime green next to the dark green stitching.

I did not have a bowl large over which to form the thread stitching but upon scouring the studio my eye fell upon a stained glass lamp shade that was just the perfect mold shape.  I took it off the lamp base, covered it in plastic wrap from the kitchen, sprayed it with Pam so that the sticky, wet thread unit would not gum up the lamp shade or stick to the plastic wrap.  Unfortunately, my hands were also sticky and wet and I did not want to pick up the camera to take a picture of that leg of the process.


Here is the completed stitching after the stabilizer was partially rinsed out.
NOTE:  I only rinsed out enough stabilizer to reveal the layered threads and the stitching.  Because I did not rinse out all the stabilizer, it remained quite sticky when wet and that was essential to the stitched unit holding a bowl shape.

Surprisingly, the thread stitched form dried within a few hours and this is what it looked like.
Although the form was quite rigid, I wanted to assure that it would not collapse or distort over time, so I painted mat gel medium over the entire surface and let that dry.  To make the form even more permanent and easy to clean in the future, I painted fast drying, clear polyurethane over the entire form. 

WaaLaa!  A thread bowl was created.
This was intended to be a "what if" experiment but when the bowl emerged as I had envisioned it, I think I'm hooked on the process.  Perhaps I will think about the possibility of using Angelina fibers in my next 3-D thread experiment.  Ahh, the possibilities!
Always remember, never fear to experiment.  
Sometimes wonderful things happen.
© Linda Friedman 2016.  All rights reserved

Wednesday, April 15, 2015

Deep Sea Ballet in Fiber - Scene 3


I'm ecstatic to report that I completed my 38"(w) x 42"(l) "Deep Sea Ballet" whole cloth, art quilt last evening.   I'm quite excited about it and am chomping at the bit to post a picture of the entire piece; however, as mentioned earlier, it may be exhibited in August, so I still must wait until the exhibit has opened.  Thus, only close ups of some elements will be posted here.

Henri Matisse's work, La Danse, was a constant inspiration as I created this work.  Perhaps you can see how Matisse's painting influenced the "Deep Sea Ballet" fiber art work.

In order to accentuate the suggestion of water movement I inserted piping between the top and the batting and stitched on either side of to create a raised effect an upward motion.
 I created upward "floating" sea flora by sewing together strips of hand dyed stretchy fabric.  After the strips were sewn together, I slashed the edges and then machine stitched the streamers to the top. The green ocean bottom image was made from a loosely woven scarf that I free motion stitched over the "base" of the sea flora and to the quilt top fabric.


To further suggest ocean flora, I hand cut a stencil from freezer paper and stenciled it with Setacolor opaque and transparent paints.


 Until August, this will probably be the last time I write about this work.  Once it is hung in the exhibit, I'll post a picture of the finished work.

Thank you for taking this deep sea journey with me.  It's been great fun.

Always remember, never fear to experiment.  
Sometimes wonderful things happen.
© Linda Friedman 2015.  All rights reserved

Saturday, March 26, 2011

"Farewell Toast to Winter"

This week I finished two more art quilts and today listed one of them, "Farewell Toast to Winter," on Etsy.com.  This was a fun and challenging work to execute.  Instead of traditional batting, I used stiff interfacing because I knew that the dense thread drawing would tend to pucker and would need a strong stabilizer.  That choice became the major challenge because the interfacing creates lines where it is bent.  Instead of this being a negative, it yielded an opportunity for further thread embellishment and texture.  Here are some photos of the piece.
Full Front Image
28 3/4" x 14 1/2"

Close-up of Stitching (Vase Bottom)

Closeup of Stitching (Stemware)

Closeup of Flower Shape

Reverse

Friday, January 21, 2011

Pocket Book for Fiber Arts Post Cards

I belong to Serendipity Play Group, a mini group of Quilts on the Wall in Southern California.  The focus of the group is on creating and exchanging 5" x 7" quilted, fiber arts post cards.  A recent project is for each member to create his or her own "pocket book" for the post cards that are exchanged.  Because my grandmother called her purse a pocket book, that image has always been among my fondest memories; thus, my take on the pocket book was the shape of a purse.

My Completed Pocket Book

Yarn Fringe Looped Through Binder Rings

Side View that Shows the Edges of Various Pages

How and Where to Insert the Post Card

Three Sets of Buttonholes were Made to Accommodate the Binder rings
(inside view)

Three Sets of Buttonholes were Made to Accommodate the Binder Rings
(Outside view)
 
Page Example with Clear Vinyl Stitched around Three Sides
and Yarn Stitched around Four Sides

Example of Page Back
with Handsewn Vinyl Pocket to Hold Card Documentation

Washers Sewn to Each Page

Another View of Washer Attachment

A Handle Was Sewn to the Back Side Edge of the Pocket Book and
Heart Shaped Buttons were Stitched to the Front Edge.
The Clousure Consists of Loops of Cording That Were Stitched to the Back Edge
and Looped Over the Heart Buttons

View of Various Pages

Open Pocket Book

Final View of Completed Pocket book

Friday, November 12, 2010

Series 1 - 6"x6" Art Quilts (A Dancer's Gift)

Recently I have been reading the dancer/coreographer, Twyla Tharp's, book, The Creative Habit: Learn It and Use It For Life, and have taken a couple of her habits and started using them as my own.  Every morning she arises, heads to her empty studio across town and starts to move.  This stimulates her mind and body to create new movements, dances and fully choreogrphed works.  She also explained how the body, not just the mind, has a memory and through repeated exercises, the body will remember, even years later, the movements in a particular choreographic creation. 

This made absolute sense to me, especially when I thought about the act of typing.  My fingers  know where the keys are but my mind does not.  Thus, upon arising each morning I now head directly to my studio, sit down at the sewing machine with a stack of already prepared 6" sandwiches of fabric and batting, and start free motion stitching. 

In the past week the following series of 6" art quilts has emerged.  Every day I am amazed at what comes from my free thinking, morning mind.  When the day comes to a close I color the designs with fabric inks.  In the hours between early morning stitching and nightfall other works seem to miraculously come to mind and now I have 3 larger quilts in the making...and all this came about from adopting a couple of techniques from a dancer's book.