
Tuesday, September 6, 2011
Using Gel Medium to Block In a Silk Screen
Just found this little tutorial in the on-line Art Trader Magazine about using gel medium to block in a silk screen. I believe the author called it Guerilla Screen Printing. http://www.arttradermag.com/how-to/guerrilla-screen-printing/ I'll write a follow-up on how well this works once I have tried it. Would like to include pictures here, but don't want to infringe on a copyright.


Flight - A New Art Quilt on Etsy
Flight
If you follow my blog you will notice that this piece started a few weeks ago with the background. The next stepo was the silk screening of the bird figure. After I discovered that I could apply handwriting without "bleeding" on the fabric, this work developed. It can also be found on Etsy at: http://www.etsy.com/listing/81239864/flight-art-quilt-wall-hanging.Close-up of Silk Screened Bird and Apple Stamped Circles

Full View of Front

Close-up of Stylized Sky Elements

Close-up of Handwriting

Full View of Reverse

Close-up; of Reverse


Monday, September 5, 2011
Tea Bags, Checkerboards and Birds - The Final
The blue jay is finally finished. Because the bird became somewhat lost on the busy background of squares, I drafted a circle around it and then filled it in with Jacquard luminescent textile paints to provide a contrast that would make the bird stand out. Satin stitching around both the circle and the tea bag was done to provide a unified focal image. The borders and reverse are made from a hand dyed fabric. Since there was only a little of the hand dyed fabric left after the borders and backing were done, the hanging sleeve needed to be pieced.
Now, it's on to working on a piece with some writing on it...


Now, it's on to working on a piece with some writing on it...
Finished Tea Bags, Checkerboards and Birds
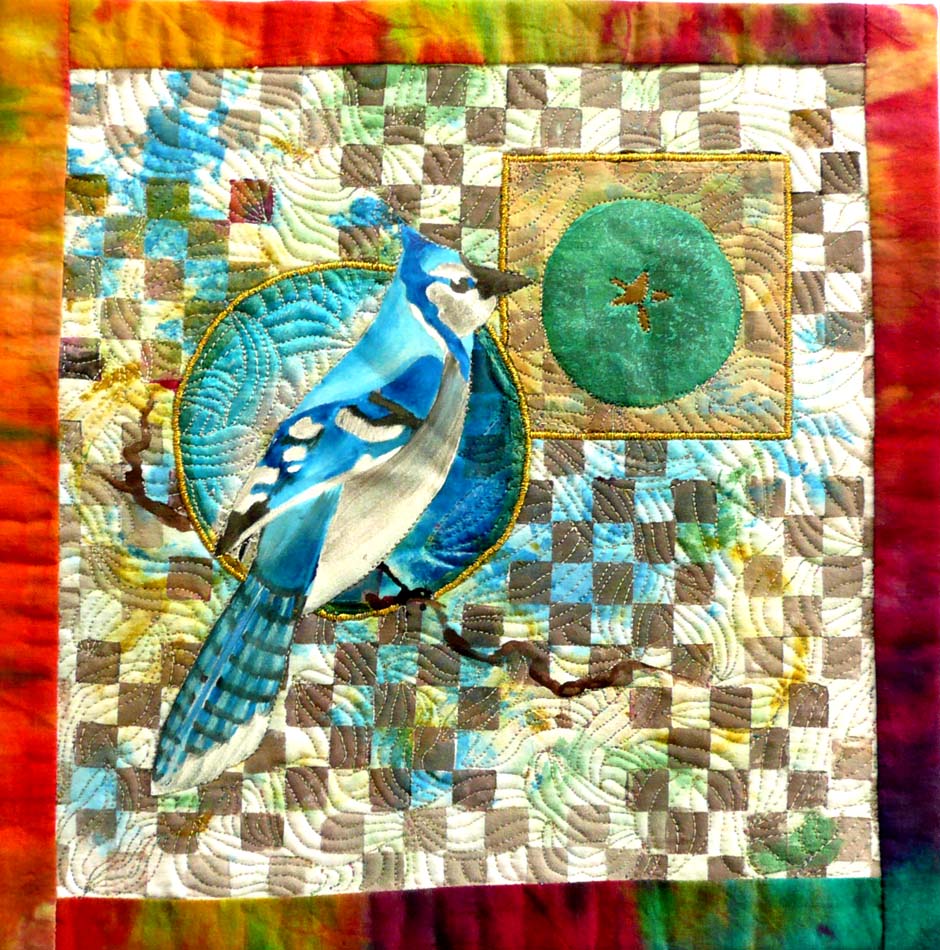
Close-up of Bird and Circle

Reverse

Label

Reverse - Close-up of Quilting

Sleeve

Close-up of Stitching around the Jay


Sunday, September 4, 2011
Writing on Fabric
Writing on Fabric with Plaid's Tip-Pen Essentials


Finished writing
I have been experimenting with various methods of adding the written word to fabrics, but until now, the results have been sketchy to say the least. Recently a friend let me use a product that she had not yet tried and I believe it is going to offer some reasonable results. As a trial, I stretched a scrap swatch of nylon voile into an embroidery hoop and elevated the hoop a bit to keep the paint from seeping through the fabric and smearing. I then squeezed some plain acrylic craft paint into one of the smaller bottles, screwed on the plastic applicator tip and then screwed on one of the metal tips. I then began writing--something...anything. Before me was a partial dictionary definition of the word, "art", so that is the reason behind this.
This is the Tip-Pen Essentials product by Plaid that I used.

Here is everything that is included with the product.
There were 3 plastic bottles with plastic applicator ends and caps
and several different sized, metal applicator tips.

Close-up of applicator tips

Voile swatch stretched in embroidery hoop.

The ease of application and the results are now leading me to search on-line for this product so that I can return the applicator to my friend. Presently I have a silk screened piece hanging to dry and am planning on adding writing to it. I'll put it on the blog for your review whether or not the results are successful.

Wednesday, August 24, 2011
Repeating Pattern - Screen and Screen Again
Repeating Pattern – Screen and Screen Again
Recently I’ve been designing patterns to use as repeats. This entry follows the creation and execution of one freehand design that can be used as a repeat.
Step 1: Fold a piece of paper in half to establish a mid line. Draw a free form design. This initial drawing was done with graphite pencil so that adjustments could be made.

Step 2: Make marks at the top of the pattern to delineate where the pattern ends and where the repeat begins.

Step 3: Repeat Step 2 at the bottom of the pattern.

Step 4: Tape the pattern to the back of a silk screen with the pattern facing the front of the screen.

Step 5: Tape all four sides of the pattern to the silk screen frame on the reverse side.

Step 6: Turn the silk screen over and place it on a light box so that the pencil drawn pattern is clearly visible. Start tracing the pattern onto the silk screen.

Close-up

Step 7: Use Speedball Screen Drawing Fluid to block in the pattern shapes.

Step 8: Put some of the Speedball Screen Drawing fluid into a small dispenser bottle with a small metal applicator tip.

Step 9: Turn the silk screen over and start filling in the shapes with the Speedball Screen Drawing Fluid from the back side. Place the screen over a piece of paper to catch any fluid that may drip through the screen.

Close-up: Application of screen drawing fluid.

Completed fill of the design with drawing fluid.

Step 10: Let the drawing fluid dry completely. Drying time will depend upon ambient temperature and humidity, but the fluid is usually dry within 2 to 3 hours. On warm and dry days, drying time is significantly reduced.
Step 11: Apply Speedball Screen Filler with a paint brush over the entire screen and covering the dry drawing fluid.

Screen covered with Speedball Screen Filler.

Step 12: After the screen filler is completely dry, rinse off the underlying screen drawing fluid. The drawing fluid dissolves quickly while the screen filler remains embedded onto the screen. (Note: When there is a need to change the image, the screen filler can be removed from the screen with soap and water. I prefer to use Krud Kutter because it removes the screen filler rapidly and can also be used for myriad cleaning jobs around the home and studio.)

Here is what the screen looked like after screening with gold screen printing ink. The gold only adhered to the screen filler, not to the pattern (even though it looks as if the pattern is obscured in this picture.)

In the present example I used a swath of fabic onto which I had previously screened a series of three circular lock with keyhole designs onto white fabric. The freeform repeating pattern was initially screened in black over the keyhole design.
To further embellish the fabric two of the keyholes were pained on the reverse with lavender fabric dyes. They were painted from the reverse so that the freeform black design would not be obscured but the thinned dye would come through to the front. The design was further deepened by applying thinned down green Grumbacher fabric dye around the lock/keyhole designs with a sponge brush. After the green background was dry, the freeform screen was used again. Onto the green layer, gold Speedball fabric printing ink was used with the freeform screen. To further enhance the visual impact birds were screened onto the background and overpapped the kehole and freeform designs. The lock/keyhole and bird screens follow this picture. 
Close-up of one part of the printed fabric.

Another printed section of the fabric.

Pictures of the two additional screens used
Lock and keyhole screen in which an embroidery hoop was used for the screen frame.

Bird screen: The bird form was cut from a sheet of overlapping masking tape strips and adhered to the screen in an embroidery hoop frame.

Now I am playing with the idea of cutting a stencil or printing on Bubble Jet Set prepared fabric or finding a Thermofax service so...
Here is another rendition of the repeating pattern.


Saturday, August 6, 2011
Tea Bags, Checkerboards and Birds
The Surface Design Journey Continues...
The question is: Is Enough Enough Now?
When designing a recent quilt for a "Gates" challenge for group, Quilts on the Wall, I painted a few birds on fabric. Two of them worked, but this Blue Jay was lost on a field of blue, so it was not used. Although the two birds that I chose for the "Gates" quilt were hand appliqued onto the background, I tried another method on this Tea Bags and Checkerboards. Since this is an exploration of surface design and not of hand stitching, I applied the bird to the background with matte gel medium and grounded it by painting a tree limb for it to sit on. I think that perhaps enough is now enough. The next question is: "Shall it have a border?" We shall see...

Close-up of Blue Jay fabric painted bird.
Applying the cutout with matte gel medium made the figure seem as if it is almost part of the fabric.

Now I wish that the fabric scrap that I started with had been a 12 1/2" square. It is shy by 3/4" so in order to make it 12"x12" I must add a border. Phoey. But, ahhh, this may be another "opportunity" to get creative.
More to come...

Friday, August 5, 2011
Fat Thread, Skinny Needle
How to Draw the Camel through the Eye of a Needle
Problem: How to draw a fat thread or one that separates through the eye of a thin needle.

Here is the needle and here is the thread.

Clip a length of thin thread and fold it in half.

Thread the loop of the thin thread through the eye of the needle.

Thread the fat thread through the loop of the thin thread.

Pull the loop of thin thread back through the needle.

As the loop is pulled through the eye of the needle, the fat thread will also be pulled through the eye.

Success! The fat thread is through the eye of the needle and ready to sew.

Subscribe to:
Posts (Atom)