Monday, February 6, 2012

Create an Art Quilt Coffee Table Book

I am honored to belong to Serendipity Art Quilts which is described on its blog as “A collaborative art quilt project for a group of like minded quilters who want to explore and expand their abilities in fabric and mixed media”.   Until recently themes were chosen every two months and we have been exchanging fabric art postcards.  The works coming out of this group were phenomenal.  This year we decided to expand our creative efforts to exchange 12” x 12” quilts on a quarterly basis. 

Our first themed work, “Writing on the Wall”, was exchanged in January 2012.  I received a vibrant and beautifully executed quilt titled, “The Color of Happy”, from Deborah Stanley.  I was so bowled over by it that I immediately began thinking about how I might showcase Deborah’s piece, as well as those that will arrive in the future and hit upon the idea of making a coffee table book.

Finished page with Deborah's 12" x 12" s mounted quilt

This is the process I developed for making pages for a quilt art book:

Since the exchange quilts will be 12” x 12”, cut a piece of cardboard 13” x 13”.  I used the mailer in which Deborah’s quilt arrived.
Audition the quilt atop the cut down cardboard to make sure that there will be enough marginal space around the quilt to allow for the addition of hold down tabs and to insert metal eyelets. (Deborah Stanley’s quilt shown here.)
Cut two (2) 13 ½” x 13 ½” pieces of fabric.


Audition the cardboard atop the fabric to make sure there will be enough fabric for ¼” around all edges.


Place fabric right sides together and pin around all edges.

Stitch around 3 sides only.  Leave one side open for turning.

Clip Corners

Turn fabric right sides out.

Poke out all corners to crisp points.

Because the printing on the cardboard showed through the fabric, I applied a coat of gesso to the entire top surface.


Because the wetness of the gesso tends to make the cardboard warp, weight cardboard until gesso is completely dry.  (Note:  It would be best to use a plain white cardboard and then this step can be omitted.)

Insert cardboard into fabric sleeve

Prop top of sleeve open with anything on hand
Apply glue to edge of cardboard
(Note:  I used Contact Cement ™.  It adhered instantly and left no bleed through onto the fabric.  Since this edge will not come in contact  with the quilt, I doubt if there would be any damage to the quilt.)

Fold fabric onto the glued edge and finger press. 

Remove separators and apply glue to the previously glued fabric

Fold top fabric toward inside of sleeve and finger press it to the glued edge.

Measure 4” away from each corner on all edges.  Mark with a straight pin.

Cut ½” strips of vinyl for corner hold downs
Apply glue to the fabric just before each pin-marked place.
Lay vinyl strips from glued point to glued point to create the hold-down strip.
Finger press vinyl to glued fabric and let completely dry.
When glue is dry, cut off excess vinyl.

Punch holes through glued vinyl areas.


Stitch embellishment with holding bead from back to front.
Completed hold-down strap element.  Do this for all 4 corners.
Completed straps on all four corners.
Punch 3 equidistant holes and insert eyelets in the side that was glued.

Completed page with hold-down straps and eyelets.
And here, again, is the page with Deborah Stanley's quilt mounted on it.

Since the quilt can now be mounted on a stiff mounting field, it can also be displayed on a stand without drooping 
Finally, create a front and back cover
in the same way as each page is constructed.  


Saturday, January 28, 2012

"Queen of Arts" - Mojo Doll

Today was a day that I had committed to quilting but I first felt compelled to clear the end of my work table.  I got off to a running start in putting things away but then I came across a small, but beautiful, piece of purple fabric. Also on the table was a pattern I had cut for a small mojo doll but had never got around to making it.  Ah ha, the purple fabric was perfect.  There went the quilting commitment and a while  later, "Queen of Arts" was born.   Here is her majesty on a variety of backgrounds.


Monday, January 23, 2012

Peace Feather

A few days ago, Nancy, of Pomegranate Trail blog, mentioned my prayer mobile (http://pomegranatetrail.blogspot.com/2012/01/prayer-flags-self-expression-and-story.html). Of course, I had to take a look.

While perusing her blog I found a link to "The Magic Feather Project". Feathers have been a recurrent theme in some of my art quilts. Needless to say, I had to check out that site also (http://spiritcloth.typepad.com/spirit_cloth/the-magic-feather-project.html).  In childhood I couldn't leave a found feather behind.  Some are still with me today.

I was so moved by the project that I set about creating a fully hand stitched feather of my own on 100% wool, and...and...and...here 'tiz :-).


Close-up
Have a peaceful day.


.

Saturday, December 31, 2011

In Honor of the Prayer Flag Project

I have been deeply moved by the Pray Flag Project and even though I am not a contributing member, the project spurred me to create a small prayer flag mobile to hang at the front door of my house.  No longer will I ever see a snippet of fabric in the same way again.  The potential of these fabric swatches is limited only by the size of one's heart.
All I did to make this mobile was stitch through each raw edged swatch,  take a few more stitches with no fabric, and then stitch through the next swatch.  Some of the fabric chains are long.  Some  are short.  Most snippets have words written on them with permanent marker, but a few await another ah-ha moment.
I cut a small diameter dowel into two equal segments and bound them together with crochet thread.  In order to attach the chains to the dowel parts, I merely punched holes into the first fabric of each chain and slipped the swatches onto the dowels and adjusted their placement to achieve a balanced mobile.  Since this will hang outside in the elements, I used indoor/outdoor wood glue to keep the chains from slipping off of the dowels if the wind should kick up.

The prayer flag chains dance in circles and move with the slightest breath of air.  Now, whoever comes to my door will be greeted with one-word thoughts that can only transport the heart to a good place.
I offer  my greatest thanks to those talented souls who contribute to the Prayer Flag Project for they have all given me pause to dwell upon only uplifting thoughts.

Happy New Year to All!

Friday, December 23, 2011

Evening Light - Saving a Memory

Last evening while I was paying bills by the soft light of an old lamp, I was compelled to put the check book aside for a few moments and to merely enjoy the light.  A pencil was at hand, as was some printer paper, and a very quick sketch developed.  A light watercolor wash followed.  Then it was back to the much less enjoyable task of writing out checks and balancing the books.  The sketch was put aside and might have become fodder for the "circular file" since it was rendered on the back of piece of paper that had computer printout on the other side BUT...
It kept being shifted around the studio all day today and I just didn't want to chuck it.  I wanted to remember that moment when the soft light captivated me.  To try to replicate the sketch on watercolor paper would lack the magic of the light filled moment.  Instead I scanned it, printed and overprinted it, reduced the size and auditioned it as a greeting card element and then...
I reduced it again, this time to 2 1/2" x 3 1/2" ACEO card size.
Now I have a set of 6 greeting cards and 2 ACEO limited editions.  After spending the day with this quick sketch, the lamp light will be imprinted on my memory for a lifetime, even if the sketch has a limited lifespan.


Tuesday, December 20, 2011

"Migration" - An 8" x 10" Art Quilt

This new work was a purely intuitive adventure in pattern, color, texture and design.  It began without an end in mind and with "quilt-as-you-go" piecing of various fabric patterns.  It was finished with a satin stitched edging.  Each of the pieced elements were free motion quilted differently.  Onto this background I screen printed two birds and free motion satin stitched around each figure.  This completed focal element was stitched onto a larger soy fiber quilted piece and then stretched and stapled to an 8" x 10" artist's stretched canvas.  Soft edges are created by the soy fibers.
"Migration" - Front
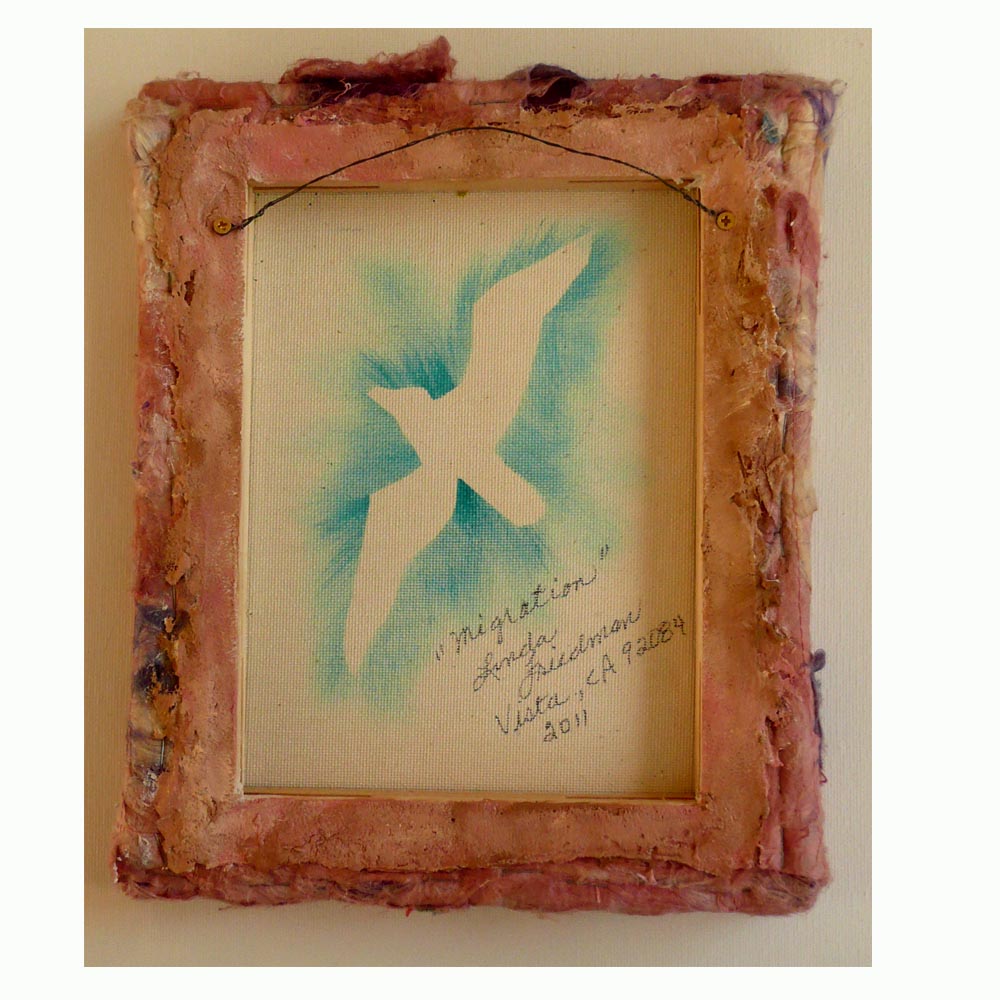
I finished the raw edges on the reverse in a rather unconventional, but effective, manner.  I used a pallet knife to apply stucco patch to the fabric edges and then feathered the edges to the stretcher frame.  After the stucco patch was completely dry and rock hard, I painted it to coordinate with the soy fibers.  The bird  figure on the back was made by using a reverse mask stencil taken from one of the bird figures on the front of the work.


"Migration" - Back

When the stucco patch is completely cured and hard as a rock, I will paint it with colors to compliment the soy fiber quilted fabric.   Again, another day of exploration and discover has been great fun.


Wednesday, December 14, 2011

Looking Back on Katrina - ACEO to Art Quilt?

We will never forget hurricane Katrina and the devastating effect this furious lady had on a wide swath of our country and our national consciousness.  As it raged ...
(Katrina)
across the South, it relentlessly covered almost unfathomable miles of land.
(Fury)
Years later, hope is returning...
(Peace)
Perhaps these recent trading card renderings will develop into art quilts one day to pay homage to the resilient spirit of those who sustained nature's fury and emerged with hope and commitment in their hearts.


Thursday, December 8, 2011

Smile: A Random Act of Joy

Every time I visit Mia Bloom's Blog "Graffiti Inspirations", ,http://graffitiinspirations.blogspot.com/, I can't help but smile and have a nice, warm, good feeling come over me.  She is painting inspirational words on canvas board and leaving these around town.  Whoever finds them, is fortunate, indeed.  As a result of the impact that her work has had on me, I figure that if more folks smiled when going about their daily lives, that kind of good feeling might be contagious.

Some scraps of card stock lay in my work table and beckoned to be used rather than tossed into the trash.  Unlike Mia's works, these are not art.  They are merely little words that may elicit a smile from those who find them tucked on shelves, on tables, on park benches or at bus stops across the city.


Thursday, December 1, 2011

Tea for Two (on a cold winter's day)

As the cool days of Fall move into the cold days of winter, what could be better than sharing a hot cup of tea with a friend or loved one?
This 19" x 22 1/2" quilt features a fabric painted background with overlaying original stamps and original stencils cut specifically for the focal image of this work.  

It was fun watching this piece develop from a  piece of fabric that I had painted with blues and whites only.  It sat on my work table for a while with nothing more than these two colors.  Then came the introduction of stamped images that I had developed.  One day a tea pot and a couple of cups sat next to the fabric, and the rest speaks for itself. 
 Focal Theme Closeup
 I could have batted, backed and bound this piece and it would have stood on its own, but I believed it needed to be framed--not with a picture frame, but with more fabric.  

I had some blue and white gingham in my stash of fabrics that was left over from a "Dorothy" costume dress I had made for my granddaughter several years ago.  The blue was right and did not clash with the painted blue.  Moreover, I felt that the gingham sang "warm and cozy and kitcheny" and would be right for the theme. 
 Feather Stitching Closeup

I had been using feather stitching on another work and since I was in feather "swing", a swag of feathers seemed appropriate.
 Lettering Closeup
The lettering was first penciled onto the fabric and since I already had the free motion foot on my machine, I gave executing the letters with a close, somewhat narrow zigzag stitch and it worked.  

 Mitered Corner Closeup
The closeup of the double fold binding makes it appear as if this is homespun fabric, but it is not.  The weave is close.  This merely shows that one continuous binding strip has mitered corners.  

Reverse with 4" Hanging Sleeve and Signed Label
If possible, I always try to make a label that reflects the theme on the front of my art quilts.  This one is stenciled, backed and appliqued to the back of the quilt.  It contains my name, city and the date, 2011, when the quilt was made.