Showing posts with label dyeing fabric. Show all posts

Monday, April 10, 2017

From Drapery to Scarf - How To


A while back I had to shorten microfiber drapes that left me with several, 74" x 20" lengths of fabric that I could not bear to throw away.  They sat dormant in my fabric stash for several months until I recently had a brainstorm on how they might be used.

A Microfiber Remnant from Shortened Drapery

The softness of the fabric was a tactile delight that I thought might feel wonderful wrapped around the neck in a scarf.

After cutting two 7" strips from the microfiber fabric, I soaked the fabric in water and then wadded up each 7" wide length and wrapped a few rubber bands around each clump of fabric.

In a microwave safe Ziploc container I then mixed up a batch of a Rit Dye product made for synthetics* in hot water, submerged the fabrics into the dye mix and lightly laid the lid onto the container.

Rit Dye for Synthetics
I then placed it into the microwave oven and heated it on high for about 3 minutes and then let it soak for a while.  After washing out the dye, the original beige microfiber became a lovely, mottled orange.

Of course, enough never seems to be enough when playing with fabric and color, so I resurrected a stamp that I had made a long time ago.
Original Leaf Stamp
Because I did not want both fabrics stamped with the same color, I picked orange and dark blue Setacolor fabric paints to use as the stamp colors.  I let the fabric dry to the damp stage and then poured the paints on an old, plastic meat tray.

It was time to print the leaf shapes onto the fabric.
Setacolor Fabric Paints and Old Meat Tray
Fabric with Orange Stamped Image
Fabric with Blue Stamped Image
Throughout the entire process, the fabric did not fray but I chose to line at least the orange stamped fabric with a pleasing color satin that I found in my stash of fabrics.

Satin Fabrics
 I merely laid the stamped fabric face-to-face on a 7" satin strip, stitched around 3 sides, turn it right side out and hand stitched it closed.

This is almost like a vestment stole that clergy wear.  It lays flat as it cascades down the chest.  I have another color satin ready to line the blue stamped fabric, but I'm not sure if I am going to line this one.  Without lining, it will drape loosely and lend itself to a variety of scarf configurations.

* I purchased the Rit Dye from Michaels; however, is available from some fabric stores and on a variety of on-line sites. 
To me, brainstorms are the spice of life.
Always remember, never fear to experiment.  
Sometimes wonderful things happen.
© Linda Friedman 2017.  All rights reserved

Saturday, July 19, 2014

Dyed Mottled Fabric, A Free Pattern and a Fabric Giveaway

Welcome, blog hoppers!  What a great morning it is.  Participating in this week-long blog hop with other demonstrators on the Quilting Arts TV Series 1400 is not only fun but it is an honor to be in such accomplished company.
 

I hope you will be checking out others' blogs on this hop.  I have visited them and greatly enjoyed each one.

If you leave a comment in the comments section below, you will be automatically entered into a random drawing for 1 yard of 100% cotton fabric that I have dyed using an adaptation of the method that I demonstrated on Quilting Arts TV Series 1400.  There will be two randomly chosen winners who will receive 1 yard each, so be sure to leave a comment.

These are the two fabrics that I will be giving away.


In my segment of the series I demonstrate a method of applying water soluble, non-toxic dyes directly to fabric to achieve some fun and often serendipitously astounding mottled fabrics.

Today I am going to talk about two subjects - (1) A recent dying project and (2) A free pattern for a vinyl covered apron to use when dyeing.

(1)  STEPS TO ACHIEVING A MOTTLED EFFECT ON FABRIC

Recently I have been working on a 36" x 48" quilt with a "Shadows" theme by adapting into fiber an acrylic painting that one of my daughters created.  I found no commercial fabric that would produce the effect that I wanted to achieve.  The following will give a glimpse into how I dyed fabric to arrive at a background that would be perfect for the "Shadows" theme.

Step 1 - Cover the work surface with a large section of inexpensive, plastic drop cloth.
Plastic Drop Cloth Covering Work Surface
 
Step 2 - Arrange needed materials
 
Non-toxic, Liquid Dyes, Small Plastic Containers, Paint Brushes, Clean-up Rag

Step 3 - Prewash and rinse the fabric to assure that all sizing has been removed.  Let the fabric remain wet after the final rinse.

Step 4 - Lay out the wet fabric onto the plastic covered work surface.

Step 5 - Pour non-toxic, liquid Rit dyes into containers and add a few drops of HOT water.
The dye colors I used were aquamarine and pearl gray.

 
Pearl Gray Aquamarine, and Dye Fixative
Step 6 - Use wide paint brushes to randomly "paint" liquid dye colors directly onto the wet fabric.  

Step 7 - Note:  At this point I tried something that I had not done before.  I loaded one of the paint brushes with opaque white fabric paint and brushed the paint over the peaks that had formed as a result of the fabric shifting while applying the dye colors.  

Opaque White Fabric Paint Applied to Peaks
Unfortunately, I must report that whatever pigment renders the white fabric paint opaque made the paint stay on the surface and did not become one with the fabric.  Ultimately I scraped it off with the edge of an old credit card after it was "cooked" in the microwave oven.

Hint Leave some areas of the fabric white and let the dye do its natural bleeding.

Step 8 - Liberally spray Rit Dye fixative over the entire dye-painted fabric and let it sit for 20 minutes.

Step 9 - After letting the fixative work its magic for 20 minutes, cover the entire fabric, front and back, with microwave safe plastic wrap and then fold it into a package size that fits into the microwave oven.  Pinch the edges of the plastic envelope.  This creates a sort of envelope to capture steam.

Step 10 - Next, pop the folded "package" into the microwave on a high setting for 1 minute and 30 seconds.  Since steam is created inside the packet, it becomes very hot so let it sit for about 3 minutes before removing the packet from the microwave.

Step 11 - Peel off the plastic wrap and then rinse the fabric in warm water.  The dye fixative does a fantastic job of setting the colors and steam further sets them, so very little or no color will be dispersed into the rinse water.

Step 12 - After the fabric dries, iron it and it will be ready to use.

Here is the piece that I dyed.  it's perfect for the background of the quilt that I am designing.
(2) VINYL COVERED APRON PATTERN

An important consideration when dyeing fabric is protective outerwear.  Needless to say, gloves are necessary unless you really like dyed figernails and nail beds.  Next, unless one is meticulous about wearing grungy clothing where dye spatters don't matter, an apron really comes in handy.  A fabric apron provides some protection; however, a vinyl covered apron offers even greater protection for clothing. 

After unsuccessfully searching the internet for a vinyl covered apron, I couldn't find one.  Thus, I designed one, stitched it up and have found it perfect for those dyeing times in the studio--or anywhere, for that matter.  A quick swipe with a damp cloth and it's good as new/.

Completed Apron
APRON PATTERN


 And remember...Drum roll please...

Leave a comment and you will automatically be entered into a randomized drawing for a yard of my 100% cotton, hand dyed mottled fabric.  Two lucky visitors will each received one yard of fabric.
AND
Be sure to check out the next blog on the Quilting Arts Blog hop.  Here is the schedule:


July 18: Vivika DeNegre at quiltingdaily.com
July 19: Luana Rubin (luanarubin.typepad.com)/Linda Friedman (lindasartquilts.blogspot.com)
July 20: Sarah Ann Smith (sarahannsmith.com/weblog)/Karen Gloeggler (http://www.seminarandsew.com)
July 21: Carrie Bloomston (suchitysuch.blogspot.com/ Catherine Redford (catherineredford.com)
July 22: Sue Reno (suereno.blogspot.com)/ Rebekah Meier (rebekahmeier.com)
July 23: Lyric Kinard (lyrickinard.com/blog) / Margie Ullery (ribboncandyquilts.blogspot.com)
July 24: Cheryl Sleboda (muppin.com/wordpress/) / Jane Sassaman (janesassaman.com/weblog)
July 25: Susan Brubaker Knapp (bluemoonriver.blogspot.com)

Always remember, never fear to experiment.  
Sometimes wonderful things happen.

 © Linda Friedman 2014.  All rights reserved.


Monday, April 28, 2014

Fold, Stitch, Dye - Quick and Easy Shibori with Rit Dye

Here's a quick Shibori project you might like to try.  Be not alarmed by the number of steps I took.  The longest part of this project was waiting for it to set and even that wasn't long.
Finished, quilted project
1.     Fold square of 1090% cotton fabric in half 4 times.  Choose very low numbered tension and increase stitch length to longest.  This will make it easy to remove stitches after the fabric has been dyed.  Stitch in radiating pattern.

Fabric folded 4 times and stitched in radiating pattern
2.     Cover work table with plastic and set up workspace.

              Materials:     2 plastic bins - one for hot water and one for cold water
                                   1 microwave safe bin with lid
                                   1 pair rubber (or other) protective gloves
                                   3 small containers to hold dye and 1 small container to hold hot water
                                   Microwave safe measuring cup (optional)
                                   2 inexpensive, plastic lab pipettes or 3 paint brushes
                                   Microwave safe plastic wrap
                                   1 spray bottle with clear water.
                                   Paper towels or sacrificial fabric for clean-up
                                   Sewing machine (hand stitching optional)
                                   Notions:  thread, seam ripper
                             
Table set-up
4.     Fill bin with very hot water.  Hottest tap water is okay.
5.     Soak folded, stitched fabric in bin of hot water.
6.     Put on protective gloves
7.     Add approximately 3 Tbs. of 3 Rit Concentrated Liquid Dye colors to 3 separate small containers.
8.     Add 3 drops of very hot water to dye in each small container.
These are different colors, but the process is the same as describe herein
8.     Remove folded, stitched fabric from bin of hot water.  Squeeze out excess water.
9.     Use lab pipette or paint brush to apply dye to fabric.  Apply lightest color first.  Allow edges of colors to meet.  I did not take a picture of this step, but I played with an image in a photo editing program to illustrate this step.
10.   Spray Rit Color Stay Dye Fixative liberally onto dyed fabric.  Let sit for 20 minutes so that the fixative can work its magic.

11.   Place dyed fabric into microwave safe container with lid.  Place the lid on top of the container but do not secure it firmly.  Steam will need space to escape.
12.   Heat the fabric for 35 seconds on a high setting.
13.   Remove fabric from microwave and let cool to the touch.
14.   Rinse fabric in bin with cold water.  Squeeze out excess water.
14.   Use seam ripper to remove stitching.
15.   Lay out 2 overlapping lengths of microwaveable plastic wrap in lengths that are longer and wider than the dyed fabric.
Overlapped lengths of microwaveable plastic wrap
16.  Lay the fabric on top of the microwaveable plastic wrap.
17.  Use paint brush or pipette to drop 3rd color into center of each circular shape.
Third color added to fabric
18.   Spray liberally again with Rit Color Stay Dye Fixative.  Let sit for 20 minutes.
19.   Lay two more overlapping sheets of microwaveable plastic wrap on top of fabric.
20.   Fold over all edges to make an envelope.
Plastic wrap envelope
21.   Fold envelope in half.
Envelope folded in half
22.   Fold envelope again.  This packet will prevent the third color bleeding into other sections.
Final fold to prep for further setting in microwave
23.   Place the packet in microwave and heat for 35 seconds to create steam inside packet.  This will further set the colors.
Packet in microwave
24.  Heat the packet in microwave for 35 seconds--NO LONGER!
25.  After 35 seconds in the microwave the packet will puff up.  This is because of
       steam that is created within the sealed plastic wrap packet.
Packet puffed after being heated in microwave.
26.  Carefully remove the packet from the microwave.  It will be very HOT!
27.  Let packet cool for 1 minute and then tear the packet open.
Packet torn open to reveal dyed fabric
28.  Rinse fabric in cold water.
29.  Squeeze out excess water
30.  Lay out or hang fabric to dry.
31.  Iron finished dyed fabric.
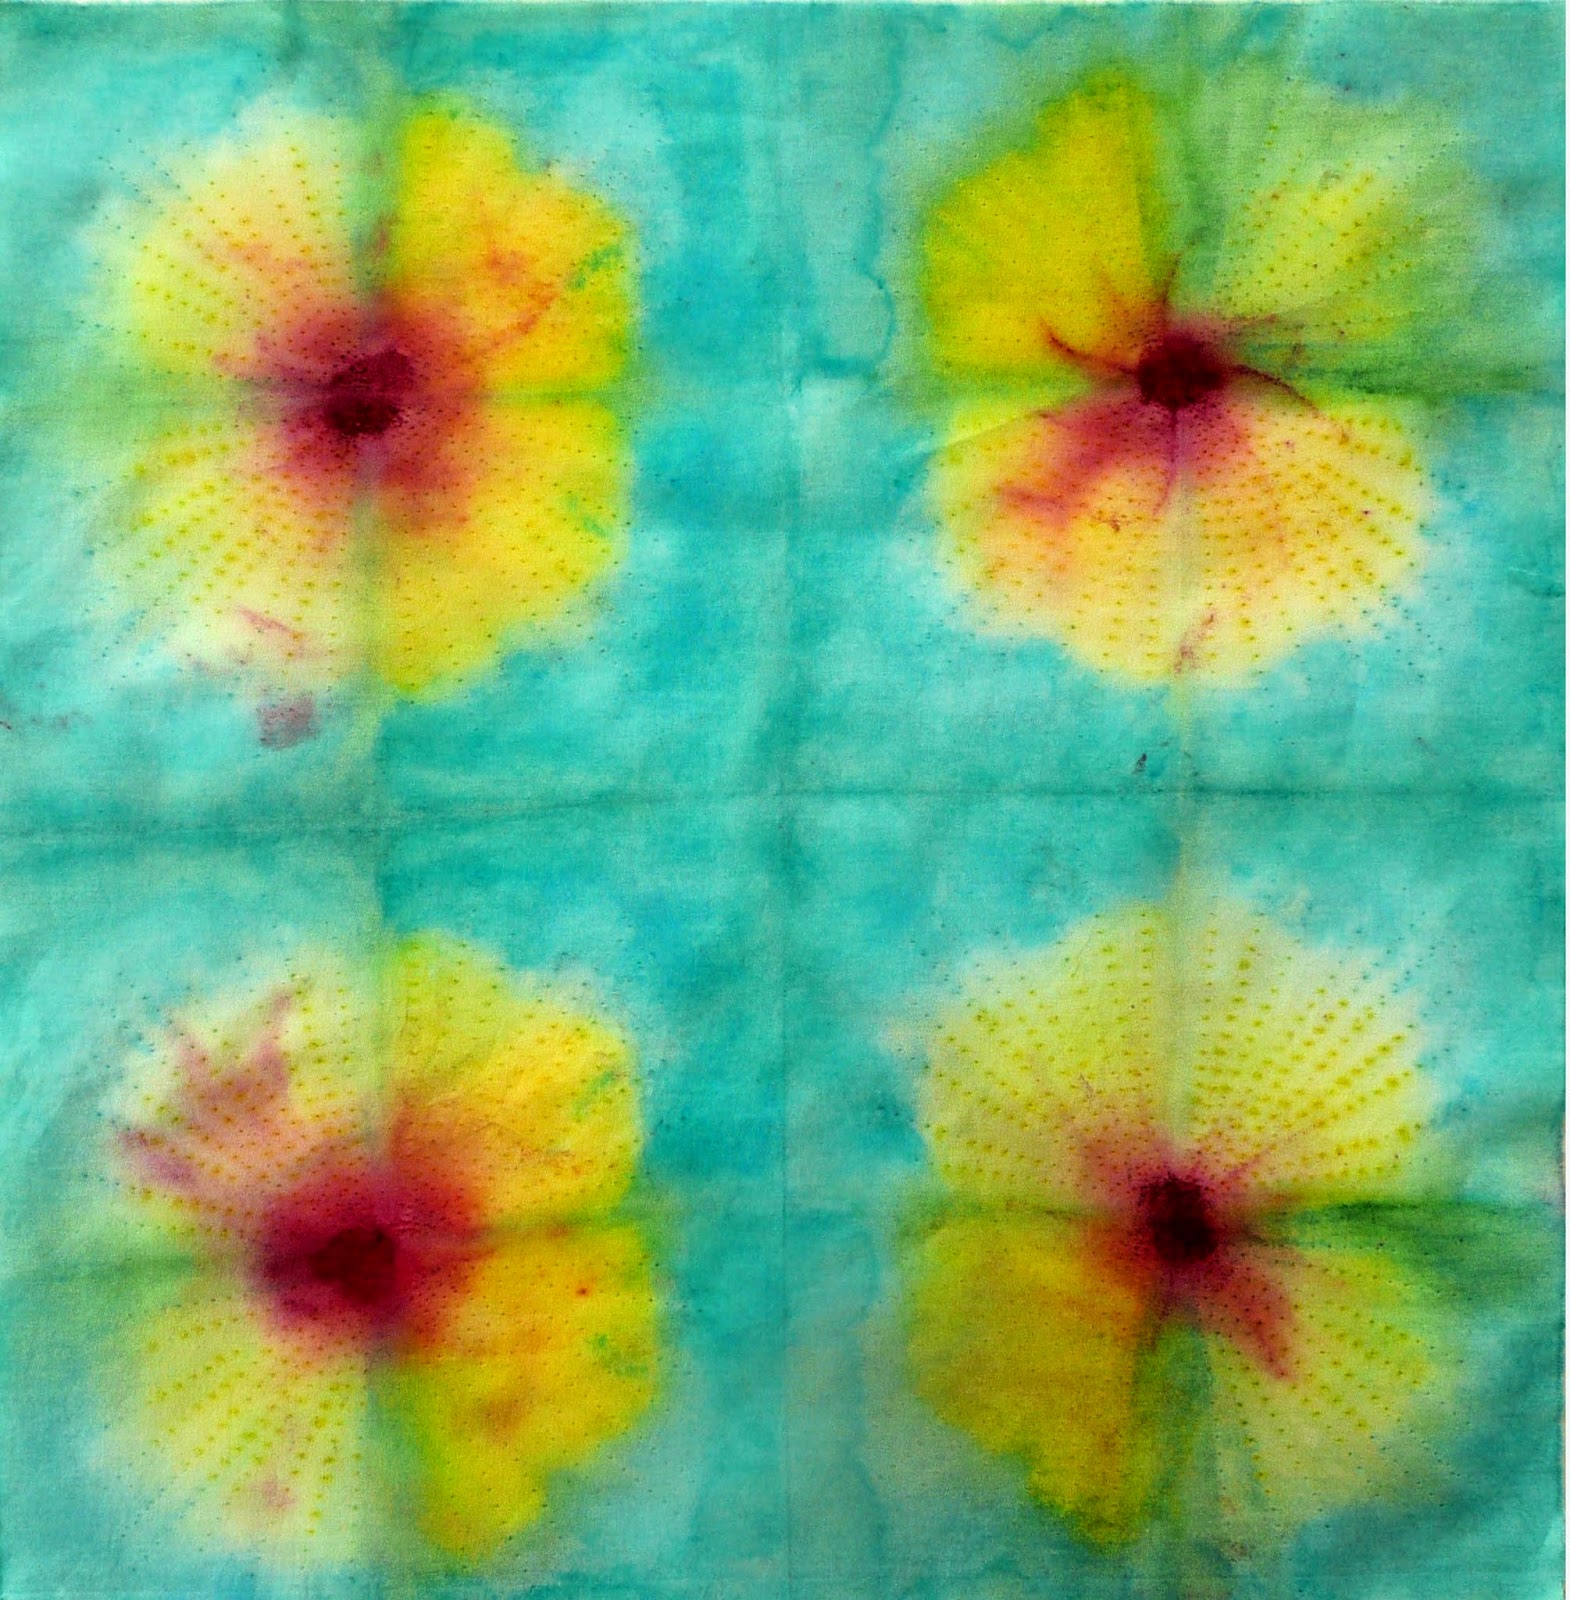
Finished dyed fabric
Whatever colors you opt to use and however you choose to use this fabric, it is sure to be a winner.     The chosen method for this work was to make a pillow-slip quilting "sandwich"; however, it could have been finished in any number of ways ranging from binding it to closing the edges with a zigzag satin stitch, etc., or you might even cut it up and incorporate it into another project.  Once again, here is how I used it.
Front view of dyed and quilted fabric
Back side of quilted, dyed fabric
And always remember, never fear to experiment.  
Sometimes wonderful things happen.
© Linda Friedman 2014.  All rights reserved.