Wednesday, August 25, 2010

"ALL A BUZZ"

This original, one-of-a-kind, 16 3/4" x 22 3/4" quilt features a floral motif and is highlighted with a free motion, machine embroidered bumble bee.


The flowers are made from hand dyed fabric that has been fused and then raw edge appliqued. The bumble bee is an original design that has been thread painted on the machine with free motion embroidery. The geometric fabric elements which support the floral arrangement were applied by turn under machine applique. Dense free motion machine quilted floral shapes and parallel diagnonal lines emphasize the focal theme.

Animation of the bee is suggested by a curving line of gold colored glass beads that have been individually sewn to the quilt.

The quilt is double fold bound with mitered corners and handstitched to the reverse and the hanging sleeve's top is imbeded under the binding.
The piece is signed and dated, also on the reverse.

Sunday, August 22, 2010

Crocheted Black Necklace with Faux Pearls

Although I finished this necklace a few days ago, it only made it to my Etsy shop today. http://www.etsy.com/shop.php?user_id=5779855&page=1&section_id=&order=

I am fortunate beyond words to have a studio that is stocked with a multitude of different fibers and supplies so that when I am not quilting or designing wearable art, the supplies are readily available to create other art related items. Years ago my grandmother made a necklace similar to this and I always wanted to create a similar piece of neckwear in honor of a lingering, gentle remembrance.


This 17" necklace was crocheted with black, cotton, crochet thread and is studded with an abundance of white, faux pearls. One end of the necklace has a loop which accommodates a large, transparent, pale blue bead at the other end for a fast and easy, yet secure, closure. It's timeless design makes this neck piece appealing to all ages and would be stunning with either casual or dressy attire.

Wednesday, August 18, 2010

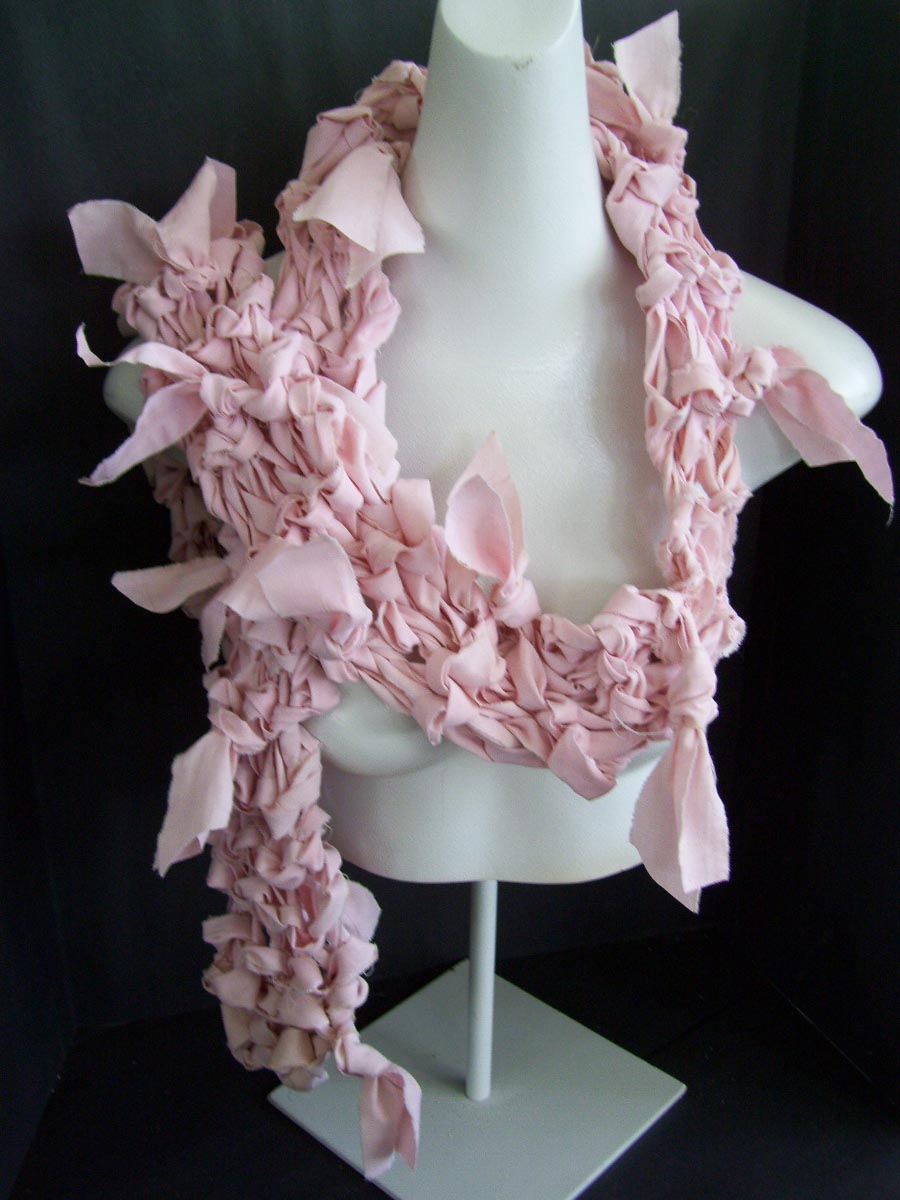
Fanciful Pink Boa

This boa was constructed with 1" strips of pale pink cotton fabric and knit on large, $35 needles. The ends of the fabric strips were tied, rather than sewn, to produce an open texture that lends a light, airy feel to the boa. The piece measures 65" in length and approximately 3 1/2" in width and may be worn in any nujber of ways. Its delicate color and whispy texture will punctuate any article of clothing over which it is worn fron elegant winter white woolens to summer tank tops and skinny jeans.


Sunday, August 15, 2010

Floral Theme with Bumble bee

"All a Buzz"
(a work in progress)
The inspiration for this quilt came from a quick sketch that I did of a pitcher with flowers. With the exception of the flower heads it is nothing like the sketch. The flowers and stems were fused and then loosely raw edge stitched with monofilament thread.


I drew this bee on a swatch of yellow fabric, put it in an embroidery hoop and set about free motion embroidering it on the sewing machine. The bee is only pinned onto the fabric in this picture. The edges need to be cut more closely and I believe that I am going to shade its body a bit to give it volume. When the quilt is complete, I will post a picture of the finished work.

Enjoy the day!


Sun Printing with Ordinary Fabric Paints

I found a great blog posting on CreativeTheHive.com on how to sun print with ordinary fabric paints mixed 50/50 with water. Very interesting. Check out the following blog for clear descriptions and photographs of the process.

Fun in the Sun Printing http://t.co/YTPmvu9 via @creatingthehive

I haven't tried this yet, but will test it out tomorrow and post a follow-up, hopefully with pictures to show the outcome

Wednesday, August 11, 2010

More Stitched Post Cards

When not at the sewing maching making textile and fiber art pieces or at the sink dying fabric or drafting new designs, I might be found creating one of a kind ACEOs (Art Cards Editions and Originals) or painted, collaged, embossed and stitched post cards. Here is a link to a Roxio slide show of some of my most recent creations. Often these become the inspiration for larger works of art in fiber.

http://www.photoshow.com/watch/Bj2HY4AU

Emulating Japanese Boro ("Rag") Art


A few nights ago while perusing YouTube I happened upon a video about old Japanese fabrics and was particulary intrigued by this one...


It spoke of Japanese Boro art, the ancient art of salvaging useable pieces of fabric from garments that were otherwise worn out.


The second garment shown captivated me. For as long as I can remember I have kept and recycled and upcycled outworn fabrics and fabric scraps into diverse forms of art. A stack of 4"x4" denim square from my grandaughters' outworn or outgrown jeans remained in my stash from a denim and velvet quilt that I made for my daughter at the holidays last year. Also in my stash was a swath of homespun fabric that I had inherited from my daughter's mother-in-law. The homespun fabric had, heretofore, never found its way into a project.


Here is my completed modern interpretation of the ancient, fine art so skillfully developed in the Far East.


2010 Take on Ancient Boro Art


Jacket Front


Jacket Back


Reversible Jacket Front


Reversible Jacket Back


Jacket with Front Panels Open


Designs Created with Clorox Bleach Pen


Initial Layout of Back Panel


Back Panel Construction


Back Panel on Dress Form


Jacket Front Laid Flat


Connecting Side Tabs


Old Lace Dyed, Old Friends Revisited


Old Lace Dyed

I inherited this old piece of handwork years ago and just today unearthed it in my stash of laces. It was like finding an old friend and dying it seemed just right--like revisiting and revitalizing relationships with old friends.


I laid out a piece of vintage, cotton lace on a disposable baking pan, lightly diluted liquid Rit Dye concentrate into glass bowls and painted the dye onto the lace with a natural bristle paint brush.


I then place the lace onto the glass plate turntable in the microwave oven...


and set the timer to 1 minute on a high heat setting and repeated the heating process 3 times.


After removing the dyed lace from the microwave oven, it was rinsed thoroughly in clear water until the water ran clear. The final step involved drying the piece with a heat gun (not a hair dryer) to further assure heat setting of color. Special care was taken not to get the heat gun too close to the lace and not to leave it too long in any one area.

I like the lace just as it is but something tells me that it is destined to develop further into a fiber art piece. Time and meanderings of the mind will tell...


Saturday, July 31, 2010

"www.isupporthandmade.com"

Fabric Book of Stitching Techniques

As I was making flat feld seams on a garment, it occurred to me that it might be fun to make a soft book of stitching technique examples, some of which my mother taught me when I was just a teenager and some of which I have taught myself along the way. Fabric that others no longer want have a way of making it to my doorstep and often these may not be fabrics that I would choose for garments or for quilting projects. One such piece of fabric was given to my daughter who then gave it to me and it has been sitting in my stash for over 8 years. Ah ha, the fabric might be perfect for a little book. Thus, from my stash and my scrab bag, emerged this little book of 12 pages, 6 of which are finished. Perhaps more pages will be added over time.

As you will surely notice, freemotion cursive writing is not among my talents, but perhaps with practice, this will improve.
Each page was hemmed for stability and a double folded "binding" area was topstitched to the page. I hand sewed a running stitch along the outside fold with twisted craft thread.
When the 12 pages are complete I will "bind" the book by weaving craft thread through the stitches from the top to the bottom so that the book will open flat.

"Sandwiching and Top Stitching"

"Lace Made on Tule Foundation"


"Simple and Corded Pintucking"
(without pintuck foot)

"Freemotion Stitching"

"Flat Feld Seams"

"Couching"


Wednesday, July 28, 2010

Free Motion Quilting

On the Textile and Fiber Arts site I found a swell blog with great free motion embroidery tutorials. Check out: http://freemotionquilting.blogspot.com/
365 Days of FreeMotion Quilting Designs. The videography is crisp and the narrative is clear and understandable.

Monday, July 12, 2010

Wildfire - A Tribute to All Wildland Firefighters

As summer heats up in Southern California, the threat of wildfires looms large. A very short time ago wildfires seemed as though they were going to burn Southern California to the ground. This quilt is a tribute to the brave wildland firefighters throughout our nation who put their lives on the line to protect our land and our populations. We owe them a huge debt of gratitude.

This quilt was made entirely from hand dyed cotton and cotton blend batting. An earlier blog entry shows the dyed batting hanging to dry.

Back of quilt.

Closeup of thread painting, beading, couching and embroidery work.

Closeup of quilting and thread painting.


Sunday, July 11, 2010

Mia Bloom Designs

I just found Mia Bloom Designs on Etsy and am enamored with the designs and eye popping color. Check out this store at http://www.etsy.com/shop/MiaRaeBloom. You won't be disappointed.

Tuesday, July 6, 2010

Dyed Batting


A couple of days ago I tried dying a wayward piece cotton batting with concentrated, liquid Rit dye in the microwave. The color was luscious and led me to needle felting soy fibers and wool roving on it. A design started to develop and this gave way to further embellishment with a few shimmery snippets, cording and embroidery using 2 ply floss. The piece was beginning to have a personality that needed to be showcased into a larger work. This morning I dyed several more remnant strips of batting in the microwave with Rit concentrated liquid dye. Since the strips were rather small, I was able to dye them in small, glass bowls, as follows:

1) Soak the strips in water to make them ready to accept the dye,2) Mix a couple of tablespoons of dye with water in a glass bowl,
3) Submerge the batting in the bowl,
4) Cover the bowl with a plate to prevent splattering in the microwave,
5) Microwave the strips for 2 minutes on the high setting,
6) Remove the bowl with potholders because the bowl was very hot,
7) Rinse until water runs clear,
8) Squeeze out water,
9) Roll strip in towel to remove excess moisture,10 Hang to dry (the process can be hurried along by using a blow dryer).

The colors are so vibrant that I would love to having them hanging around the studio on permanent display, but hopefully today I will be able to merge them with the embellished piece that I created yesterday.