"Balancing Act"
 |
| 30"x54" Black and White Quilt with 10% Color |
I'm extremely honored to report that my work, "Balancing Act", has been juried into the Quilts on the Wall exhibit, "Black and White with a Twist", at this year's International Quilt Festival in Long Beach, California from July 27 through July 29. If you plan on attending the event, I'll be sitting at the Quilts on the Wall table on Saturday, July 28th from Noon until 2:00 p.m. and I'd love to have a chance to chat with you.
This work began with a drawing and went through several transformations.
 |
| First Drawing |
I conceived the ribbon shapes being shaded red, but I was afraid that this version would use more than the prescribed 10% color so it was back to the drawing board.
 |
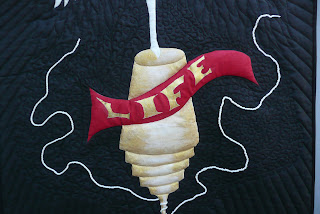
Second Drawing
|
This second drawing came fairly close to the final rendering; however, the "Balancing Act" label across the top's banner was a bit too obvious. I was hoping that the work would speak for itself and would not need an explanatory word road map. Ultimately, I chose to use the word, "Life", to let the viewer read into the work from his/her own perspective.
The first drawings were rendered on 8 1/2" x 11" paper. The next steps were to print the final drawing on a poster setting, tape the multiple sheets together and then tape the entire unit to the cutting board work surface.
 |
| Enlarged Drawing |
After the drawing was secured to the drawing board, I laid white cotton fabric on top of it and taped down the edges. Next I traced the drawing onto the fabric with pencil. It is at times like these that I wish for a huge light box because seeing the lines through the fabric was challenging in some places where the lines on the paper were not dark. That's where imagination and artistic license were put to use.
 |
Transferred Drawing with Beginning
of Color Blocking |
I used Setacolor Transparency Black Lake applied to the edges of the figure with a rather small, stiff, rounded point, paint brush made specifically for fabric painting.
 |
| Continued Color Blocking |
Working close to the edges of the figure was a rather slow and meticulous process, but as I worked away from the edges of the figure, I was able to use a larger, flat brush to apply the color and this moved along a bit faster.
After the entire background was blocked in with black, I began work on blocking in the banner and the image of a spinning top.
 |
| Blocking Color of Banner |
The three pictures that follow represent a very small quilt piece that I assembled and free motion stitched as I was auditioning how I might quilt the larger work. Since the figure was created directly with stitching and not a drawing, you will note that the figure is very cartoon like and, horror of horrors, it is missing a foot :-) This was okay, though. I merely needed some sort of shape around which I could experiment with quilting motifs. Ironically, I didn't use any of these with the final work but it was a good exercise to determine what I would NOT use.
 |
| Front of Quilting Trial |
 |
| Back of Quilting Trial |
 |
| Closeup of Quilting Trial |
Before I assembled a quilt sandwich I first baste stitched around the figure onto a layer of rather high loft batting, turned it over, and very close to the stitching line carefully cut away the high loft batting that extended beyond the figure.
Then I assembled a quilt sandwich comprised of the top layer, wool batting and backing fabric and used spray baste to secure all layers.
Stitching the Figure Outline and Wings
(Note: Later added beading to define
neckline and bodice and to intimate clothing)
Before I started quilting the background, I wanted to give the figure more personality, so I gave her a wild, raw edge appliqued headdress.
 |
| Raw Edge Appliqued Headdress |
Because I knew that close, heavy quilting might tend to distort the fabric, I first quilted around the figure with black thread and then set about quilting the wing feathers. At first I started to quilt each feather but didn't like how it flattened the feather shapes so I took the seam ripper to it and removed those threads. Unfortunately, this left needle hole markings. I overcame this by going back to each feather and stitching similar lines with no thread in the needle. Ultimately, I liked the texture that this gave the feather shapes.
After completing the quilting around each of the images, including the spinning top and the banner, I set about free motion quilting the background that surrounds the shapes.
 |
| Free Motion Quilting Around Figures |
 |
Straight Line Quilting that Radiates from the Head of the Figure
(Note: Lighting made this appear blue, but it is actually black) |
After the entire background was quilted, the fun of embellishing began. I made a small quilt sandwich of white fabric and free motion stitched the shape of a feather and then cut close around the edges. This was sewn by hand to the quilt backing to imitate a falling feather.
 |
| Falling Feather |
At the tip of the spinning top shape I threaded a large eyed needle with string and sewed in and out and around the tip of the top. I made sure to leave a long tail on the string on both ends and then hand couched the string to the backing.
 |
| String Hand Couched to Represent a Spinning Action |
As mentioned above, I defined the figure's neckline and bodice with an outline of beads. To me the massive black background might have been interpreted as an abyss and I didn't want that. I wanted to reflect hope and possibility--an elevation of life and an aiming for the stars while performing life's delicate "balancing act", so I punctuated the background with a diagonal swath of randomly placed glass beads to suggest stars.
 |
| Reaching for the Stars |
After binding the piece and affixing a label to the reverse side, the quilt was finished and I was happy.

So, all you quilt affionados, do visit the International Quilt Festival at the Long Beach Convention and Entertainment Center that starts this coming Friday evening, July 27th and runs through Sunday, July 29th. Be sure to stop by the Quilts on the Wall exhibit that features the works of 27 quilt artists from the Southern California area.


WONDERFUL! I love seeing and reading about the development of this beautiful finished work. I remember seeing this in person, Linda, and it is STUNNING! Congratulations! Wish I were there to see the display. I am so proud of you!
ReplyDeleteThat's right! You visited for a couple of days just before the deadline for submitting the quilt for jury review. I just wish I could master photographing black and white. Oooo, wouldn't it be fun (at least for me) if you lived closer so that I could benefit from your advice, critical eye and superb photographic talents.
DeleteBravo, Linda! Another spectacular piece of art. Have a wonderful time at the show.
ReplyDeleteanne
Thank you, Anne. Your support means the world to me.
Delete