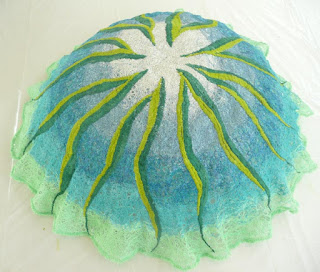
In the past I've made scarves from stitched thread, yarn cuttings and water soluble stabilizer but recently I had a lot of clippings and wanted to work them into a large, dimensional work and thought that a bowl might be a good starting place.
Here is how I made this large, 21" diameter bowl.
I first sorted threads according to colors and how I wanted them to appear on the bowl. I also had a lot of white left over threads that I wanted for the center of the bowl but they do not appear in this picture.
Here is the stabilizer I used as well as some of the threads I used to stitch the bowl.
Next I cut two large square layers of water soluble stabilizer and placed the threads in circular layers onto the stabilizer. I then cut 2 more layers of water soluble stabilizer and placed these layers atop the threads. I used 4 layers of stabilizer because I did not want to use an embroidery hoop on this large a project.
After placing the threads between the stabilizer, I pinned all layers together.
I started free motion stitching with overlapping, free form circles over the green thread clippings.
NOTE: All stitching needs to be overlapped so that the form does not fall apart when the water soluble stabilizer is rinsed out.
Here is what the basis of the bowl looks like when much of the circular areas have been stitched.
The center was the last to be free motion stitched.
Once the center was stitched, I drew long, spiky leaf shapes radiating from the middle of the circular form. I then started filling in the shapes with a close, free motion, zigzag stitch. The next picture shows the beginning. After all dark green shapes were filled in with stitches, I mirror stitched lime green next to the dark green stitching.
I did not have a bowl large over which to form the thread stitching but upon scouring the studio my eye fell upon a stained glass lamp shade that was just the perfect mold shape. I took it off the lamp base, covered it in plastic wrap from the kitchen, sprayed it with Pam so that the sticky, wet thread unit would not gum up the lamp shade or stick to the plastic wrap. Unfortunately, my hands were also sticky and wet and I did not want to pick up the camera to take a picture of that leg of the process.
Here is the completed stitching after the stabilizer was partially rinsed out.
NOTE: I only rinsed out enough stabilizer to reveal the layered threads and the stitching. Because I did not rinse out all the stabilizer, it remained quite sticky when wet and that was essential to the stitched unit holding a bowl shape.
Surprisingly, the thread stitched form dried within a few hours and this is what it looked like.
Although the form was quite rigid, I wanted to assure that it would not collapse or distort over time, so I painted mat gel medium over the entire surface and let that dry. To make the form even more permanent and easy to clean in the future, I painted fast drying, clear polyurethane over the entire form.
WaaLaa! A thread bowl was created.
This was intended to be a "what if" experiment but when the bowl emerged as I had envisioned it, I think I'm hooked on the process. Perhaps I will think about the possibility of using Angelina fibers in my next 3-D thread experiment. Ahh, the possibilities!
Always remember, never fear to experiment.
Sometimes wonderful things happen.
© Linda Friedman 2016. All rights reserved


Great tutorial, Linda! You're really perfecting this technique. I'm looking forward to seeing more bowls!
ReplyDeleteHappy that you like it, Mia. Since snipped threads always accumulate, I'm sure there will be more and different constructs.
ReplyDeleteI'm enjoying perusing your blog this morning. This piece is delightful. Mary Beth Kile
ReplyDeleteThanks, Mary Beth. I'm glad you're enjoying your visit to the blog and taking a moment to comment.
Delete