Wednesday, August 24, 2011

Repeating Pattern - Screen and Screen Again

Repeating Pattern – Screen and Screen Again


Recently I’ve been designing patterns to use as repeats. This entry follows the creation and execution of one freehand design that can be used as a repeat.

Step 1: Fold a piece of paper in half to establish a mid line. Draw a free form design. This initial drawing was done with graphite pencil so that adjustments could be made.


 Step 2:  Make marks at the top of the pattern to delineate where the pattern ends and where the repeat begins.

 Step 3:  Repeat Step 2 at the bottom of the pattern.

Step 4:  Tape the pattern to the back of a silk screen with the pattern facing the front of the screen. 

 Step 5:  Tape all four sides of the pattern to the silk screen frame on the reverse side.
 

 Step 6:  Turn the silk screen over and place it on a light box so that the pencil drawn pattern is clearly visible.  Start tracing the pattern onto the silk screen.

Close-up 

Step 7:  Use Speedball Screen Drawing Fluid to block in the pattern shapes.

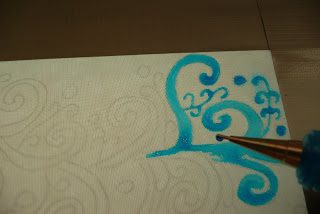
Step 8:  Put some of the Speedball Screen Drawing fluid into a small dispenser bottle with a small metal applicator tip. 

Step 9:  Turn the silk screen over and start filling in the shapes with the Speedball Screen Drawing Fluid from the back side.  Place the screen over a piece of paper to catch any fluid that may drip through the screen. 

Close-up:  Application of screen drawing fluid. 

Completed fill of the design with drawing fluid. 

Step 10:  Let the drawing fluid dry completely.  Drying time will depend upon ambient temperature and humidity, but the fluid is usually dry within 2 to 3 hours.  On warm and dry days, drying time is significantly reduced.

Step 11:  Apply Speedball Screen Filler with a paint brush over the entire screen and covering the dry drawing fluid. 

Screen covered with Speedball Screen Filler. 

Step 12:  After the screen filler is completely dry, rinse off the underlying screen drawing fluid.  The drawing fluid dissolves quickly while the screen filler remains embedded onto the screen.  (Note:  When there is a need to change the image, the screen filler can be removed from the screen with soap and water.  I prefer to use Krud Kutter because it removes the screen filler rapidly and can also be used for myriad cleaning jobs around the home and studio.)

Here is what the screen looked like after screening with gold screen printing ink.  The gold only adhered to the screen filler, not to the pattern (even though it looks as if the pattern is obscured in this picture.)

In the present example I used a swath of fabic onto which I had previously screened a series of three circular lock with keyhole designs onto white fabric. The freeform repeating pattern was initially screened in black over the keyhole design.
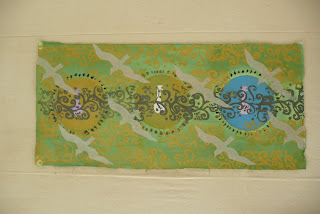
To further embellish the fabric two of the keyholes were pained on the reverse with lavender fabric dyes. They were painted from the reverse so that the freeform black design would not be obscured but the thinned dye would come through to the front. The design was further deepened by applying thinned down green Grumbacher fabric dye around the lock/keyhole designs with a sponge brush. After the green background was dry, the freeform screen was used again. Onto the green layer, gold Speedball fabric printing ink was used with the freeform screen. To further enhance the visual impact birds were screened onto the background and overpapped the kehole and freeform designs. The lock/keyhole and bird screens follow this picture.


Close-up of one part of the printed fabric.

Another printed section of the fabric. 

Pictures of the two additional screens used

Lock and keyhole screen in which an embroidery hoop was used for the screen frame.

Bird screen:  The bird form was cut from a sheet of overlapping masking tape strips and adhered to the screen in an embroidery hoop frame. 

Now I am playing with the idea of cutting a stencil or printing on Bubble Jet Set prepared fabric or finding a Thermofax service so...

Here is another rendition of the repeating pattern. 

Saturday, August 6, 2011

Tea Bags, Checkerboards and Birds

The Surface Design Journey Continues...
The question is:  Is Enough Enough Now?

When designing a recent quilt for a "Gates" challenge for group, Quilts on the Wall, I painted a few birds on fabric.  Two of them worked, but this Blue Jay was lost on a field of blue, so it was not used.  Although the two birds that I chose for the "Gates" quilt were hand appliqued onto the background, I tried another method on this Tea Bags and Checkerboards.  Since this is an exploration of surface design and not of hand stitching, I applied the bird to the background with matte gel medium and grounded it by painting a tree limb for it to sit on.  I think that perhaps enough is now enough.  The next question is:  "Shall it have a border?"  We shall see...

Close-up of Blue Jay fabric painted bird. 
Applying the cutout with matte gel medium made the figure seem as if it is almost part of the fabric.

Now I wish that the fabric scrap that I started with had been a 12 1/2" square.  It is shy by 3/4" so in order to make it 12"x12" I must add a border.  Phoey.  But, ahhh, this may be another "opportunity" to get creative.
More to come...


Friday, August 5, 2011

Fat Thread, Skinny Needle

How to Draw the Camel through the Eye of a Needle

Problem:  How to draw a fat thread or one that separates through the eye of a thin needle.

Here is the needle and here is the thread.

Clip a length of thin thread and fold it in half.

Thread the loop of the thin thread through the eye of the needle.

Thread the fat thread through the loop of the thin thread.

Pull the loop of thin thread back through the needle.

As the loop is pulled through the eye of the needle, the fat thread will also be pulled through the eye.

Success!  The fat thread is through the eye of the needle and ready to sew.


Thursday, July 28, 2011

Tea Bags and Checkerboards - Surface Design Surprise

I'm still cleaning brushes and tools on fabric instead of paper towel.  Glory, glory, another tree is saved and the results are great fun.  Just wish that I had been doing this before. 

The first layer of blues, yellows and golds came from cleaning brushes that I used in a bird painting for a challenge quilt that I have been developing.


The second layer emerged by using screen printing ink that remained on tools that I was using for another project.  I grabbed a foam checker board stamp and somewhat randomly stamped over the first layer

After enjoying an afternoon glass of iced tea, I opened the tea bag, cleaned out the tea leaves, rinsed it and laid it flat to dry.  Just couldn't leave well enough alone.  Some apples were almost over ripe and instead of throwing them into the compost bin, I cut one in half and made a print on the tea bag.  After it was completely dry and heat set with an iron, I used matte gel medium to make it a part of the fabric.

Enough is still not enough...at least I don't think it is.  We shall see what does or does not develop from here.  I suppose it will depend on what colors will need to be cleaned off of tools from the next project.

It is great fun seeing what develops when there is no plan or preconceived idea.  Onward!


Wednesday, July 27, 2011

Don't Throw That Paint Away

Instead of using miles of paper towels to clean fabric painting and screening supplies, try developing the habit of cleaning tools on a swath of fabric.  The picture below shows a rather fun design that is developing from cleaning a credit card that I used in a couple of screen printing projects.  It was then overstamped with an apple print.  It will be fun to see when enough is enough.  Then it will be time to pull out another piece of fabric and start a new surface design adventure.


Print with an Apple

My first printing experiment with fruit from the produce department was with an orange and now I've tried an apple.  The orange prints are being worked into a quilted work and will appear here when it is completed, but, for now, here is the apple print.


Thursday, July 14, 2011

Masking a Silk Screen with Beeswax

This morning I was wondering if melted beeswax would work as a silk screen mask or if the wax would merely melt the screening fabric.  Although several projects are laid out on my work table waiting to be finished, the idea of using a beeswax mask kept haunting me until I hauled out an embroidery hoop that already had a screen in it.  Still, I figured I had best put this idea on the back burner until at least some quilting work had been addressed.  I'm afraid that didn't work.  Out came the electric heating plate and the pan of beeswax.  By this time it was difficult waiting for the wax to melt.

The following pictures show the steps to a successful printing with the use of a silk screen masked with beeswax.

Set the electric plate on low to melt the beeswax slowly. 

The beeswax is melted.

Tools Used
These are the only tools I used.  One is a natural bristle brush that will be dedicated hereafter to wax use only.  Other, non natural brushes will melt with the heat of the wax.  The second is an inexpensive tjanting tool that is specifically fashioned for batik wax application.

A paper plate was used to catch any drips between the melting pan and the silk screen

Melted wax with heated tools.  Heating the tools keeps the wax from cooling and hardening too rapidly.

The screened embroidery hoop is laid face down on newspaper and wax was applied to the back side of the screen.  If the wax had been applied to the front side, it would have seeped through to the newspaper and the screen would have adhered to the paper.

After the wax had cooled and hardened the hoop was turned over.

This is the back side of the screen to which the wax was applied.  The natural bristle brush was used to mask in a rectangular frame for the design, to apply the intersecting grid lines, and to put big dots in the middle of each grid square.  The tjanting  tool was used to make the wavy diagnonal lines and to add small dots.

Commercial fabric that approximated a hand dyed fabric was used as a ground

A faux credit card and a spreading tool were both used to pull the printing ink through the screen, but the wax that came through to the top side of the screen created an extremely bumpy surface that made full coverage difficult.

In order to assure that ink was successfully applied through the screen to the fabric, a brush was used on the screen.

This is what the screen looked like after ink application with a brush.  (See the big bumps of wax?)

This is the final screen printed image.

It dawned on me that the wax that had emerged on the top screening part of the silk screen could be picked off to produce a smoother top screening surface.*

After the globs of wax were picked off, I was able to successfully use a faux credit card as an ink pulling tool.

This is this is the screened image that the modified screen produced.

And here is a panel of screen prints from the wax masked silk screen.

CLEAN THE SCREEN WITH COLD WATER IMMEDIATELY AFTER PRINTING IS COMPLETE.   The use of hot water will soften the wax and the design can be lost.

A wax masked screen can be used over and over again.  Something convenient about using an embroidery hoop as a screen frame is that screens can be removed and set aside for future use and new screens can be inserted for different projects.  Since the image in this project had a waxed border and ink didn't need to be pulled to the edges, I didn't even need to tape the hoop edge to make a well.

*There is only one disclaimer to be offered here. I only needed to pick off the big globs of wax from the front of the screen. The thin tjanting lines didn't need to have wax picked off. Some lines were so delicate that a few came off of the back.


Friday, June 24, 2011

Opportunity to Purchase a Thriving Sewing Business

I just found out about a tremendous opportunity for any who might be interested in purchasing a thriving sewing business that meets the needs of the medical community and patients. Fabric inventory also for sale. Check out Hats 4 Ewe at http:www.hats4ewe.com/.  Contact information is posted on the web site.

Thursday, June 23, 2011

A Plea from Me to You

http://givebacktoschools.avery.com/schools/index?cmp_id=avery-email-June11-secondary_gbts&ACID=&RMID=US_Newsletter_2011_06_Survey_E&RRID=389389627


I'm attaching this link to Avery Office Products with the hope that you might take the time to register with so that you can vote for my grandson's school, Monte Vista Elementary in Vista, CA 92084. I have discovered through my daughter who volunteers regularly at the school that because of budgetary constraints the children are not being provided with essentials like paper, pencils and books.

Unfortunately and primarily because of the sad state of our economy, many of the children are from homes whose budgets are already at or below poverty level and these students do not have access to basic tools to augment their learning process. Because of the generosity of those parents who are able to contribute, these basics are being provided but only on a severely limited basis. It is impossible for the few to provide adequately for the total school population. I registered and voted today.

Presently, Monte Vista Elementary is number 500+ down the line, but I am hoping that with our votes, one of which can be added daily, we might be able to skyrocket this number to a win. An investment of just a moment of our time could make a significant difference in many children's lives.

If you do register and don't wish to receive promotional notices from Avery, merely leave the bubble next to this option blank. I often use the free template downloads that Avery lets the public access, but your vote is NOT contingent upon receiving promotional material.

If you opt to cast your votes, I send you my greatest gratitude. $10,000 would make a world of difference to Monte Vista Elementary School children.

With great thanks,
Linda

Tuesday, June 14, 2011

Silk Painting Play Date


Last Sunday five art quilting friends met at one of our houses to spend a full day exploring the art of silk painting and generally having a great day filled with laughter, good food and creativity.  To see a slide show of the projects, click on the link below.