Recently a friend conjectured that I might be able to use the two
wooden rods on a tattered fabric scroll and and she gave the entire scroll to me. Indeed, it was a mess. It was stained, ripped, and the fabric was
degraded in several places. It sat in my
studio for only a day when I set about trying to give it new life while
maintaining the integrity of its past.
What follows is a journey of rebirth.
The tears and degraded areas were mended using 6 ply
embroidery floss in a loose and wide cross stitch pattern.
Close-up
of Mended Section

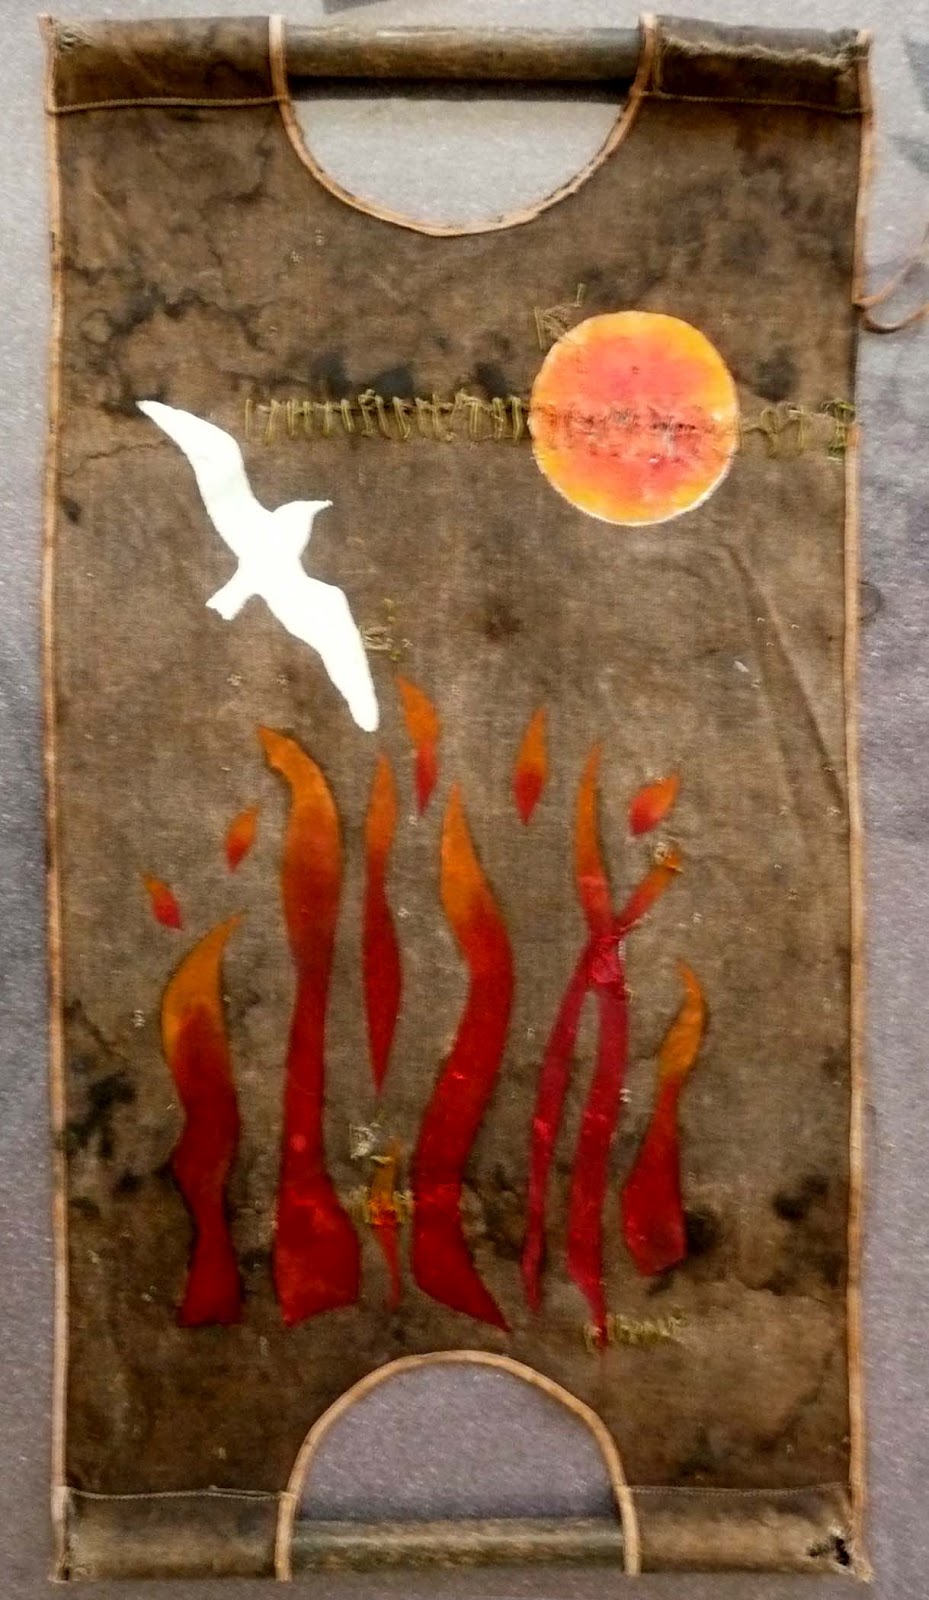
Since the original, tattered
piece looked and felt to the hand as if it had been either through a fire or had been
buried in the earth, I wanted to convey a sense of hope, even in the most dire
of times. The image of a bird rising
from flames and soaring toward the sun came to mind. I used a craft knife to cut simple flame
shapes from freezer paper to make a stencil and then ironed it to the fabric.
Stencil
Ironed to Fabric

Choice of Flame Colors

Because I used Setacolor
transparent fabric paints they tended to disappear into the dark fabric. I ended up mixing acrylic craft paints into
the Setacolor paints and added a smidgen of fabric medium to the mixture. Even after doing this, the flame shapes were
rather transparent, but when I removed the stencil, I liked the modulation of
color intensity that was produced.
Painting with Setacolor Fabric Paints

Although the semi transparency worked out well for the flames, I wanted the bird form to be opaque so I used Speedball screen printing white ink with a screen that I had made for another project
Screen Printing a Bird Image Using Speedball Screen Printing
Ink

Screen
Printed Bird Form and Stenciled Flame forms

Originally I had planned to only
have flame shapes and a soaring bird shape; however, when I looked at it, I
thought it looked more like a bird escaping flames and that is not what I
intended to convey.
In order to suggest hope, rebirth, and elevation of spirit I cut a circle out of card stock and used it to suggest a sun shape, a light source to which the spirit could reach out.
In order to suggest hope, rebirth, and elevation of spirit I cut a circle out of card stock and used it to suggest a sun shape, a light source to which the spirit could reach out.
Circle Stencil Cut from Card Stock

Since I had already learned that
transparent fabric paints tend to sink into a deeply colored background, I
chose to first apply a layer of gesso using a hand cut card stock circle template as a
stencil.
Layer
of White Gesso

After the gesso dried I first
stenciled around the edge of the circle with Setacolor Orange. While the orange color was still wet, I
applied Setacolor Red to the center of the circle, painted outward and
feathered the red color into the orange color.
A narrow ring of white gesso can be seen and I like that. It adds another visual depth of field.
Sun
Shape Painted with Setacolor Transparent Fabric Paints over a Base of White
Gesso

It wasn’t until I hung the piece
on the design wall to assess what more might be added to this piece, I
discovered that I had printed onto the back of the fabric. At first I thought, drats, I sure goofed on
this piece but as I looked at it further, I began to like the way that the
mending stitches looked on this reverse side and how even the hanging hoop
showed the mended area. Now, I am at
peace with this serendipitous mistake.
Fully
Mended and Painted Scroll
Next I will remove the wooden rods, add batting and a backing to stabilize the piece and then lightly free motion machine quilt this piece before reinserting the rods. When the piece is completed, I will post more about the process and add photos of the work.

Linda, I LOVE this piece! It's a thrill to see the step by step process. Looking forward to seeing the quilted finished artwork.
ReplyDeleteMia, I'm quilting it today. The worn fabric is a challenge to work with but I'm hoping it turns out as In envision it. Glad that you like it.
Deletewonderful to see the steps that you took to transform this scroll into a work of art~!
ReplyDeletethank you for sharing.
:-)
libbyQ
I finally finished this piece but have not yet posted the pictures and steps that it involved. Hopefully, I'll have time to do that soon.
Delete