 |
| Array of Six Mixed Colors |
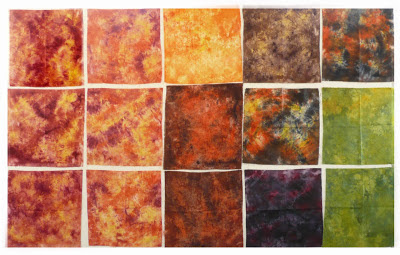
In a matter of a couple of hours I had produced over twenty 14" x 14" gloriously dyed fabrics.
 |
| A Sampling of the Dyed Fabrics |
At the end of the following process outline are pictures of numbered fabric examples and Rit liquid colors that I used.
Let’s see...what colors did I use?
(First , I used the liquid dye, not the Rit powered dye. Next, I used a
lab dropper to apply the Rit and since I only had one dropper, I had to clean it between
colors. That was a pain in the neck so I am going to look for these flimsy, inexpensive, plastic droppers on-line and stock up on them for future use.)
On many of the pieces I started with Lemon Yellow and used more of that
than any of the other colors because it was the lightest and could be
overwhelmed by the darker colors. I didn't measure anything. I just dropped and swished and squished. Here were some color combinations that were used in the examples shown:
Lemon Yellow and Tangerine
Lemon Yellow and Tangerine and Sunshine Orange
Lemon Yellow and Sunshine Orange and Scarlet
Lemon Yellow and Wine
Lemon Yellow and Wine and Navy Blue
Lemon and Navy Blue
Wine and Navy Blue
Lemon Yellow and Brown
The process:
1. Wash out any sizing from the fabric and thoroughly rinse out any
soap.
2. Squeeze out excess water from the fabric but leave it quite wet.
3. Lay the fabric on a protected surface. (I used vinyl because it cleans up so nicely.)
4. Randomly drop or streak colors across the fabric.
5. Scrunch the fabric to blend the colors
6. Hold the fabric up to see if the majority of white areas are
gone.
7. Lightly scrunch the fabric and put it into an oven safe, non metallic
container with a cover so that steam can be created.
8. Place in microwave for 4 minutes on high setting.
9. Let the container cool down a bit.
10. Rinse, rinse, rinse until water runs clear.
11. Squeeze out excess water.
12. Roll in towel and squeeze (I step on my roll) to remove more
water.
13. Iron, if desired.
To see pictures of individual dyed fabrics keep reading :-)
To see pictures of individual dyed fabrics keep reading :-)
The next time I do this, I will have dry pieces of fabric at hand to mop
up the colors on the protected surface between color changes. I used paper
towels to clean up and the blended colors were pretty spectacular, so maybe they
can be captured on fabric. If I do that, I will need to spray the clean-up
cloth with water to help the colors blend before “cooking” them.
Rit also has a mixing chart on their web site and
I may print that out so that even more colors can be created from the ones already on hand.
Here are the numbered examples. See below for the dye colors used in each piece.
 |
| Numbered Fabrics |
Afterthought: A friend who does not have a microwave asked if applying Rit dye directly to the fabric could be "cooked" in another way. I have not tried the following, but it might work...
Instead of putting the microwave and oven safe baking dish into the microwave, perhaps it could be put into a range oven with the temperature set to at least 212 degrees (boiling point) and then let it "cook" at that temperature for 3 or 4 minutes. This is merely conjecture and I have no idea how the fabric might turn out.
WARNING #1: Even though a baking dish might say microwave and oven safe, be very careful when removing it from the heating source. Glass and glasslike products don't seem as stable as they were in the past. Let the baking dish with the "cooked" fabric cool off a while before removing it. These containers have been known to shatter in one's hands. When creating any art, waiting is the hardest part, but caution needs to be the order of the day.
WARNING #2: Do NOT use the baking dish for food after it has been used for dying fabric.
.jpg)
.jpg)


Love these fabrics! I will try this dye process next time I'm dyeing fabrics. I love how you break the "rules".
ReplyDeleteLove the colors and the spontaneity that can be achieved with the use of Rit Dyes. Thanks for sharing.
ReplyDeleteMary Beth
Hi Linda, We love what you have done with Rit! Your colors are so beautiful! Please email me at diannesews@aol.com I would like to chat with you!
ReplyDeleteThanks,
Dianne
This works fabulously with batting. I don’t remember what the fiber content was of the batting I used (probably cotton), but the colors were brilliant.
ReplyDeleteI want to thank you, so much, for this! I dyed a ton of fabrics by just using the Rit Dyes the way you instructed. Oh my! I got some gorgeous fabrics dyeing them this way! No other method seemed to give me what I was looking for. Thanks!
ReplyDeleteVery nice blog post for donuts food.
ReplyDeleteWe are one of the leading manufacturers, suppliers and exporters of an exclusive Tartrazine Food Colour Manufacturers.
ReplyDelete