Showing posts with label Setacolor fabic paints. Show all posts

Friday, March 11, 2016

Painting Fabric over Gutta Resist

Today, as I was looking through my studio drawers for tea lights, I ran across water soluble gutta resist, small, squeeze bottle applicators and needle pointed plastic syringes.  Instead of starting the laundry as I had planned, I whipped out a 14”x14” piece of white cotton fabric, laid it atop a plastic bag to protect the work surface and tried to draw gutta up into the syringe so that I might be able to make fine resist lines.  

 Unfortunately, the gutta was too thick to draw up into the syringe so I set about making markings onto the fabric with the squeeze bottle applicator.  What started out as fairly thin lines became fat lines as the gutta resist “bled” into the fabric.  Any plans I had for creating a design that made sense flew out the window and then came the scribbling.  I figured that I might as well fill the space with markings.  What could hurt?

I then hung the fabric to dry.  After about an hour the gutta was completely dry. I lightly spritzed the entire square with plain water.  Next I applied a 1:1 ratio of Setacolor fabric paints and water with a 2” brush.  The first color I used was yellow and then applied Oriental blue in diagonal stripes that ultimately bled into the yellow, as I had anticipated it would do.
Painted Fabric Over Gutta Resist Hanging to Dry

I was initially disappointed with the image, probably because it did not turn out as I had hoped it would.  However, as the piece dried, I began to increasingly appreciate the randomness of the image.  Now I wish that I could be able to replicate this, although I know that will be impossible.
Here is a picture of the fabric after the gutta resist was washed out, dried again and then ironed.
Final Fabric from Gutta Resist, with Yellow and Oriental Blue Wash of Setacolor Fabric Paints

Revisiting the use of gutta as a resist has spawned new questions.  I am now wondering if the gutta could be applied over a stencil with a wedged make-up sponge.  Unlike the lack of flow control when using a squeeze bottle applicator, I pondering that the amount of gutta applied might be better controlled by using a small, dense sponge.  I have a few more 14” x 14” squares of cotton fabric just waiting for further experimentation.  Hmmmm.  Possibilities! Gotta love ‘em.
Always remember, never fear to experiment.  
Sometimes wonderful things happen.
© Linda Friedman 2016.  All rights reserved


Thursday, March 10, 2016

Birds on a Tin Tile Print

Through a Garden Fence
After attending a fantastic plein aire class on tin tile printing given by Teresa Shippy, I came right home and used a tin tile to make four prints using Setacolor fabric paint.  At another time I will post the process for this printing.  I then sashed each printed square with hand dyed purple fabric, backed each of the four center squares with batting so that I could make them dimensional, and then applied batting to the back of the entire top.  On the center stashing pieces I machine appliqued free form leaf shapes and auditioned petals for a middle medallion shape.

Life and other quilting deadlines intervened and almost 3 years passed before I revisited this creation.
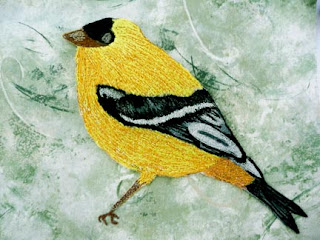
While straightening up my studio in anticipation of a friend who will be visiting to quilt with me for a week, I came upon the Through a Garden Fence that I had started a few years back.  I had always envisioned putting birds on this quilt, so I dug out some white cotton fabric and painted birds on it.  After the painting was complete I pulled out tear away stabilizer and embroidery hoop and set about free motion machine "painting" a few birds.  I'm not certain exactly where they will be placed yet, but I may place one at each of the points where the four leaf shapes converge upon the center of the quilt.  Here are the birds...


There are a few deadlines that I need to meet in the next few months so I don't know when I will have the time to return to this work to actually quilt the work and to applique the birds, but I'm hoping to have it completed this year.  
Always remember, never fear to experiment.  
Sometimes wonderful things happen.
© Linda Friedman 2016.  All rights reserved

Wednesday, December 2, 2015

Block Printing with Foam #3

Auditioning Color Overlays

If this is the first time you are visiting my blog about Block Printing with Foam, you can find the beginning stages of step #1 HERE and step #2 HERE.

Today I am going to take you through the process of auditioning colors that I might use as washes over the initial printing.  I first printed 4 blocks that would be used solely to determine colors for the 40" x 40" piece that I am creating.

In each instance Setacolor transparent fabric paints were used to make washes with a paint-to-water ratio of 1:1. On all but one of the blocks I first laid down a wash of Lemon Yellow.  No picture is shown for that. 
Option #1
Lemon Yellow with a Swath of Cobalt Blue
Option #2
Lemon Yellow with 3 Drops of Bright Orange and Cobalt Blue around Circles
Option #3
Yellow with Light Wash of Cobalt Blue and Denser Diagonal Swath of Blue
Option #4
Cobalt Blue Wash--No Underlay of Yellow
Ultimately, I chose to work with a combination of the colors in Option #1 and Option #3.  When I am able to show the finished work in the future, it will become evident why I chose those colors to augment expression of the theme.

Darn it.  I wish I could tell you what the theme is so that you might better understand what influenced my choices. Ah, such a mystery.  I assure you that the final work will be shown in the future.  For those of you who follow along, you will know exactly how it came to be.

Note:  These posts are my participation in the 31 Day Blog Writing Challenge.  If you, too, would like to participate, link to Cheryl Sleboda's:  http://muppin.com/…/inde…/the-31-day-blog-writing-challenge/
Until tomorrow...
Always remember, never fear to experiment.  
Sometimes wonderful things happen.
© Linda Friedman 2015.  All rights reserved

Monday, September 29, 2014

Quilts in Mancuso Quilt Fest, Palm Springs, CA


It was great fun this morning to receive a flier from the Mancuso Quilt Fest and to find that two of my quilts will be in the show.  They will be in the Special Exhibits section.  "Autumn's Palette"will be with the "Appearances" exhibit from Quilts on the Wall.   "Between Heaven and Earth" is in the "Fiber Perceptions" exhibit with Beyond the Edge Fiber Artists.
"Between Heaven and Earth"
"Autumn's Palette"
 If you happen to be in the Southern California area between October 2nd and October 4th, be sure to take in Quiltfest.  It's sure to be a great show.
Always remember, never fear to experiment.  
Sometimes wonderful things happen.
 © Linda Friedman 2014.  All rights reserved.


Thursday, July 10, 2014

From Small Block Print to Large Stencil - A How-to Guide

I am presently developing a quilted art work in which I am using one image in a variety of orientations, sizes and colors.  It started with a very large bird image that will appear on the front of the quilt but I also wanted it to appear on the reverse side. 

                                 From this                                  to this...


First I cut a block,
Soft Kut Printing Block

I printed the block in my sketchbook,

I cropped the top image and printed it in 2x2 
poster format and taped the pages together.

Next I cut enough freezer paper to cover the image

Here is the freezer paper laid over the image 
with the shiny side down.

 I traced around the image with a 
fine tip permanent marker.

A stencil is now ready to be cut with a craft knife,
BUT,.,

Before beginning to cut, I removed the posterized
 image from under the freezer paper.

Here is the beginning of the stencil cutout.

Here is what the partially cut stencil looked like.  
The remainder of the shapes were ultimately cut out.

I ironed the the fully cut out freezer paper stencil to
 the fabric on which I wanted the image to appear.

I used a plate as a makeshift palette, foam brush
and Setacolor opaque white fabric paint to paint
the stencil.

And here is the finished stenciled image that I believe
 successfully suggests a very large block print.
 
Always remember, never fear to experiment.  
Sometimes wonderful things happen.
 
 © Linda Friedman 2014.  All rights reserved.